


Introduction
Are you looking to build a beautiful online store to showcase your products, make sales, and manage your orders? Do you need to accept bookings? Or integrate with your in-store Point of Sale systems?
Squarespace Commerce gives you all the tools you need to create a killer online store and start making sales.
This guide's gonna teach you everything you need to know to get your store up and running with Squarespace Commerce.
Plus, we'll give you tips on how to take your online store to the next level.

This is a big guide, so feel free to jump around using the table of contents above. We'll give you an overview of Squarespace Commerce and walk you through setting up a store.
In this tutorial, we'll cover key questions like:
- What is Squarespace Commerce, and how is it different to regular Squarespace?
- What are the differences between the Squarespace Commerce plans?
- What's the best template for Squarespace Commerce?
- How do I accept online orders?
- How do I accept bookings and appointments with Squarespace?
- How do I sell products In-store (POS) with Squarespace?
- How do I add my products to Squarespace?
- How do I handle payments, taxes, and calculating shipping with Squarespace?
- What are the most useful plugins for Squarespace Commerce?

About Peach’s
Peach's whole shtick is that we want to help you grow your Squarespace store.
How do we do this?
We make plugins that integrate exclusively with Squarespace Commerce.
We provide tools to run modern marketing campaigns like refer-a-friend programs and affiliate marketing.
Because of this, we know a lot about building websites, running an e-commerce stores, and growing a business.
We work with hundreds of businesses every day that sell products online with Squarespace.
We know the ins and outs of Squarespace, and we know what makes the best stores successful.
Squarespace E-Commerce Plan Comparison
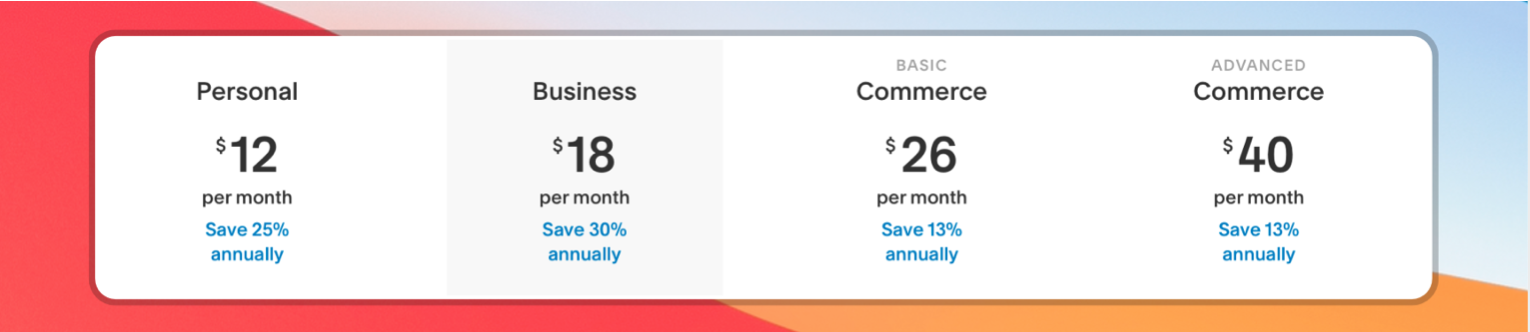
Squarespace has four plans: Personal, Business, Commerce (Basic), and Commerce (Advanced).
For an online store, you need to use one of the latter three plans.
Our strong recommendation is that you use Commerce (Basic) or Commerce (Advanced) instead of Business.
Why?
Squarespace Business vs Commerce
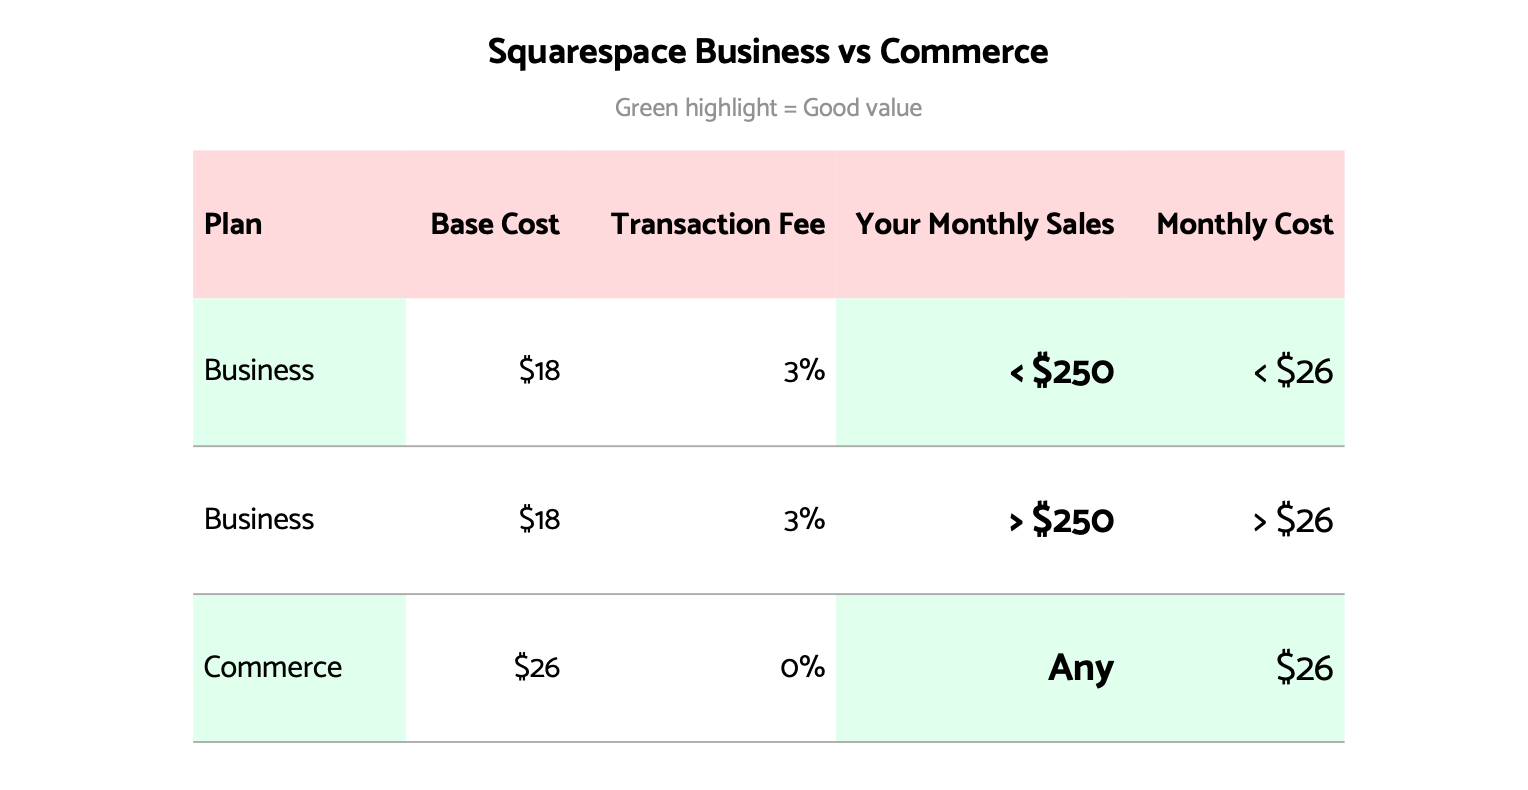
The first reason we recommend Commerce plans over Business plans is the price.
The key difference here is that the Business plans have a 3% transaction fee, while the Commerce plans don't have a transaction fee.
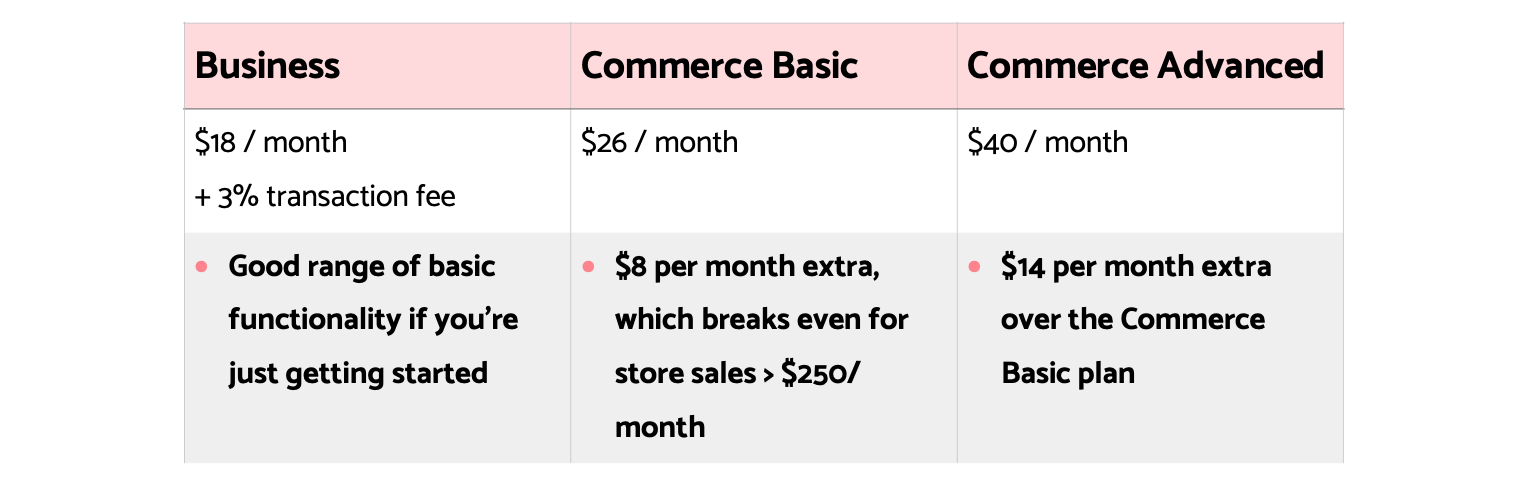
So for a difference of only $8 per month (billed annually), you can eliminate Squarespace's transaction fees from your store.
That means if you make more than $250 per month in sales through your store, you're better off using a Business plan.
Plus, as a business owner, $8 per month is a really negligible expense compared to a million other things, like rent, electricity, staff, and tools. Your online store is the backbone of your business – it's not worth cheaping out here.
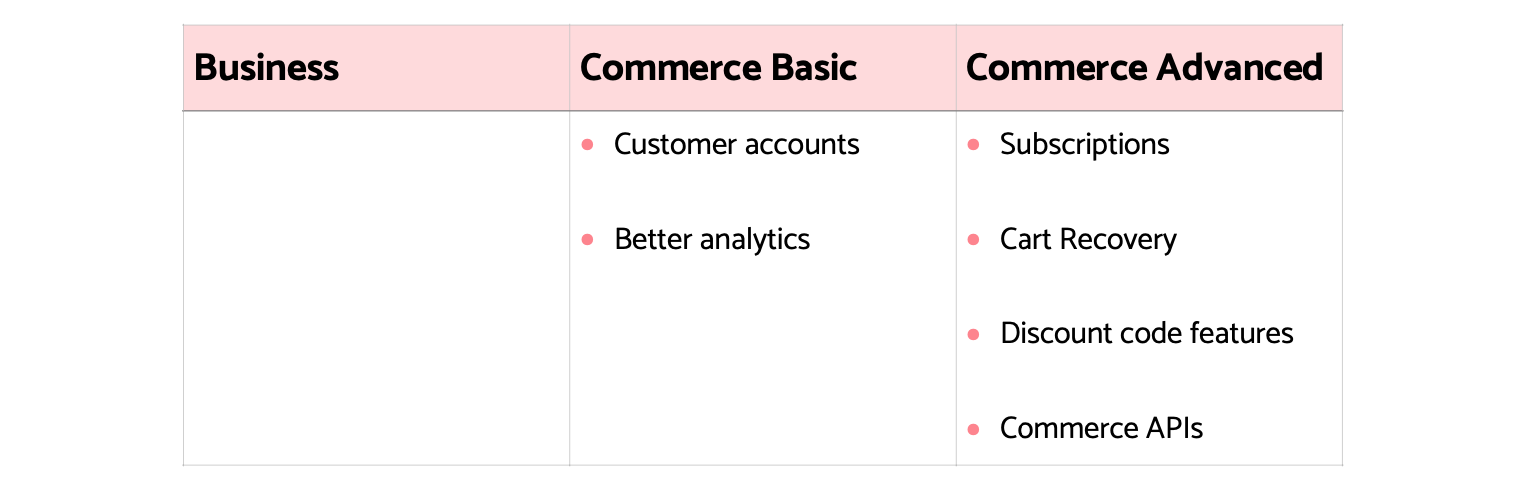
The second reason we recommend Commerce plans are the extra features you get for that additional $8 per month. You get:
- Customer accounts to enable faster transactions for repeat customers
- E-commerce analytics to give you stats on how your products are performing
- Checkout on your domain to give your business credibility and build customer trust
- Instagram integration for better social marketing
Squarespace Commerce Basic vs Advanced
This one isn't as much of a no-brainer. Both Commerce Basic and Advanced are great value.
(Seriously – you can get an entire online store for $40 per month!)
Most of the time, we'd recommend upgrading to Commerce Advanced.
Unless you don't need any of the features below and the extra $14 per month is going to be significant for you. On Squarespace Commerce Advanced, you get:
- Subscriptions
- Cart Recovery
- Better discount codes restrictions (e.g. by category and limiting the number of uses)
- Commerce APIs – essential for using a lot of great Squarespace plug-ins
- More shipping features
These features eventually become really useful for a lot of the businesses we work with, and the extra revenue their store is able to generate through subscriptions, cart recovery, and plug-ins more than makes up for the additional cost.
Squarespace Alternatives
When it comes to online stores, the major options are Squarespace, Shopify, BigCommerce, WooCommerce, and Magento.
Squarespace and Shopify are the best modern e-commerce options in 2026.
In practice, we find that our customers start out on Squarespace to grow their stores, and then when they reach a certain size, they migrate to Shopify.
Squarespace Commerce vs Shopify – Features
In a nutshell, Shopify is better suited to bigger stores because it allows for more advanced features and plug-ins. For stores that have a product range under 50 products, or they're just getting started, Squarespace helps you start making sales fast.
Why? Squarespace has better templates, design tools, and a simpler editor. You'll be able to focus on creating your products and brand, not tweaking your store with a bunch of advanced options.
Honestly, extra options are a distraction until you get to a certain size. We know stores doing hundreds of thousands of dollars in monthly revenue on Squarespace.
You can create a business of any size on Squarespace. The extra Shopify features only matter if you need specific things for your store.
Squarespace Advantages
- Easier to get a nicer design
- Better page builder
- Better low-cost solution
- Squarespace is starting to add more plug-ins and partner apps, but these are currently limited to a small number
Shopify Advantages
- Advanced e-commerce features
- A true App Store
- More advanced customization options
- Shopify Payments has no transaction fee
Squarespace Commerce vs Shopify – Pricing
In general, Squarespace is lower cost than Shopify. How do the pricing plans compare?
First, we generally recommend the Squarespace Commerce plan over the Squarespace Business plan. The 3% transaction fee on Squarespace Business means upgrading to Commerce is almost always worthwhile.
At most price points, Squarespace Commerce is lower cost than Shopify. However, if you need Shopify's extra features, it is comparable when using Shopify Payments as the payment gateway.
We compared the base costs for each of the major plans on both platforms.
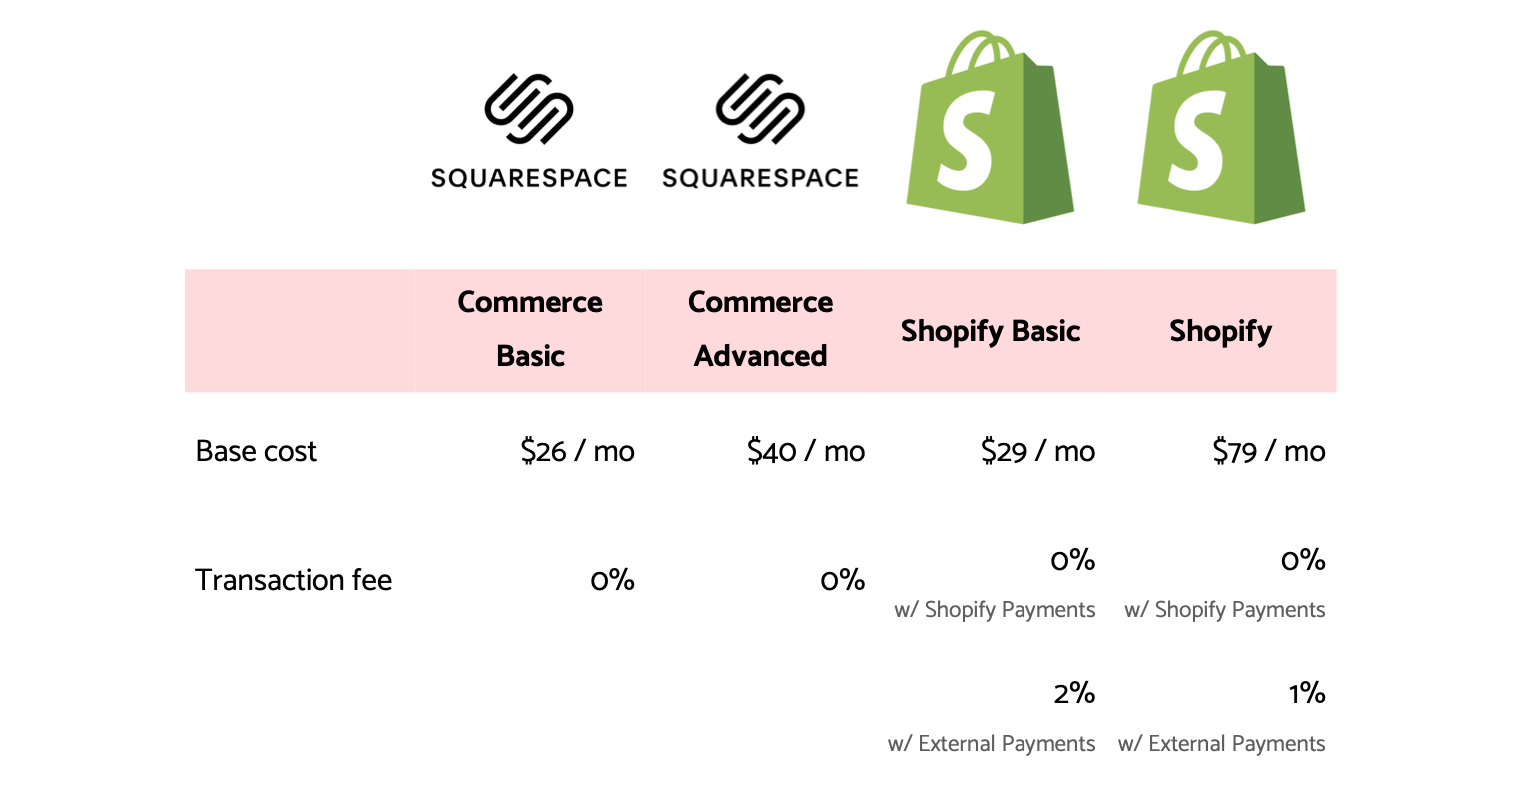
We also ran the calculations for the costs you can expect to pay for $500, $5,000, and $50,000 in monthly sales.

Squarespace E-Commerce Templates
Squarespace offers dozens of expertly designed templates. The quality of their templates sets Squarespace apart from other e-commerce site builders.
And the best thing is all these templates are available at no extra cost – unlike Wordpress (WooCommerce) or Shopify where you need to pay extra for each template.
For Squarespace 7.1, use any template! For Squarespace 7.0, we recommend Brine, Farro, Skye, Tremont, or York.
There are three factors to consider when choosing your template: customer accounts and subscriptions, special commerce features, and the design of your site.
Customer accounts and subscriptions
To sell subscription products on Squarespace, it's easiest if you use a template that supports customer accounts out of the box. This means you won't have to set up custom navigation for accounts, and everything will look great by default.
In Squarespace 7.1, all of the templates support customer accounts automatically.
In Squarespace 7.0, the following templates have automatic customer accounts integration:
- Adirondack
- Avenue
- Bedford
- Brine
- Five
- Galapagos
- Montauk
- Pacific
- Skye
- Supply
- Tremont
- York
Special commerce features
Some Squarespace templates offer special commerce features which help your customers explore your products and navigate your site.
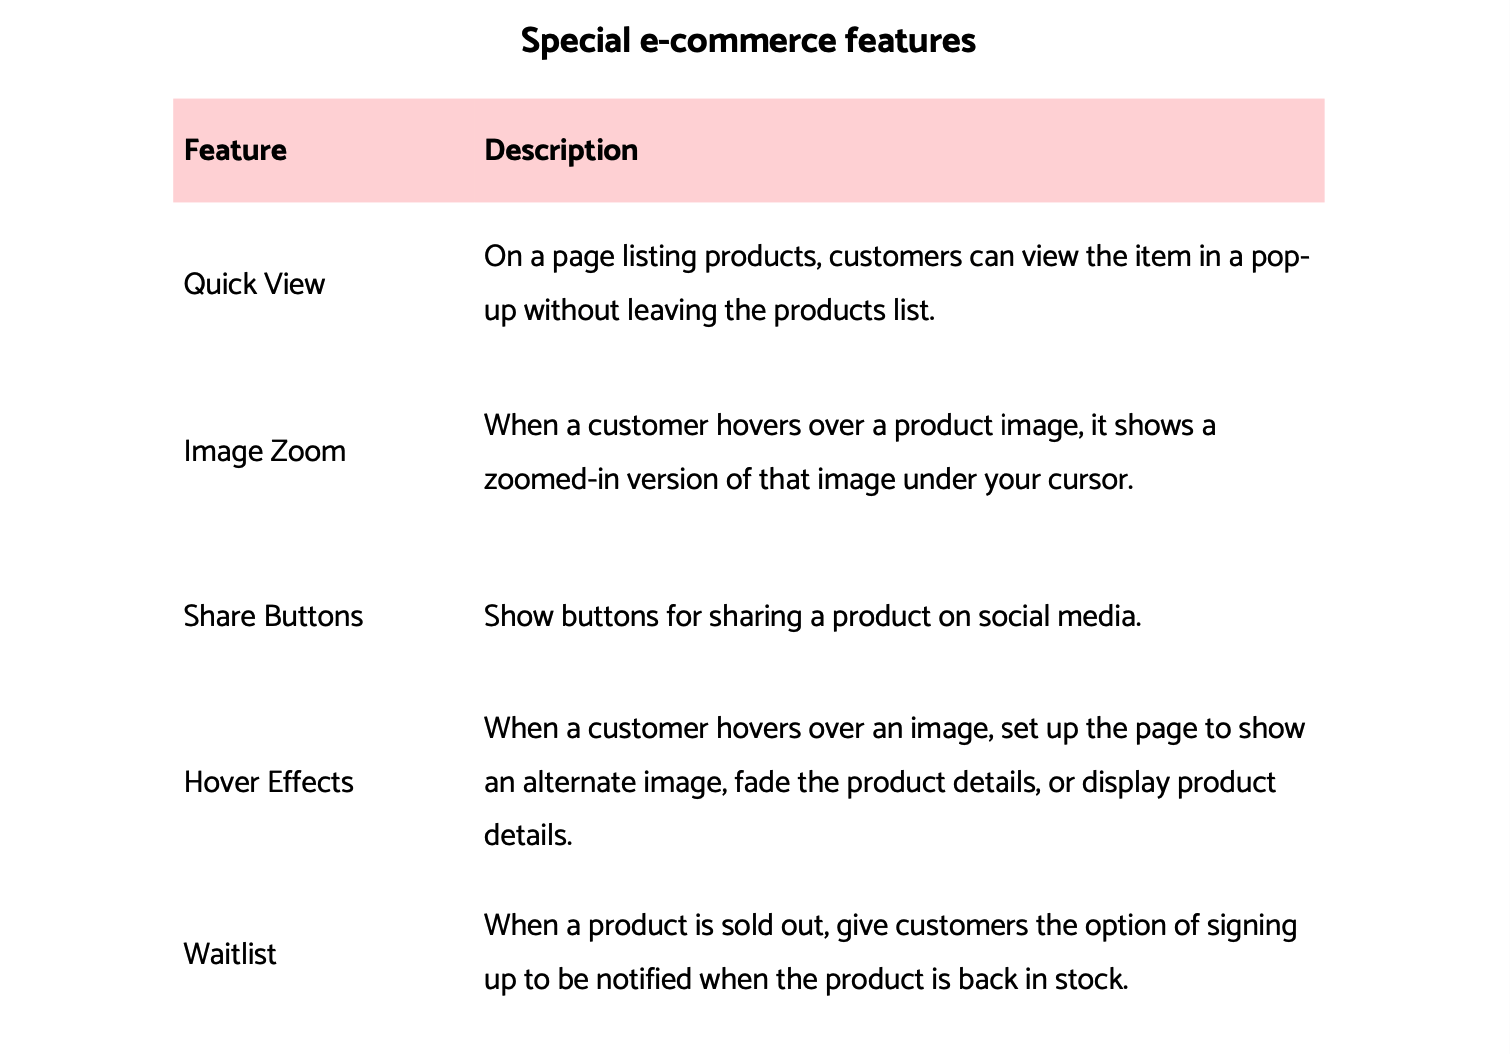
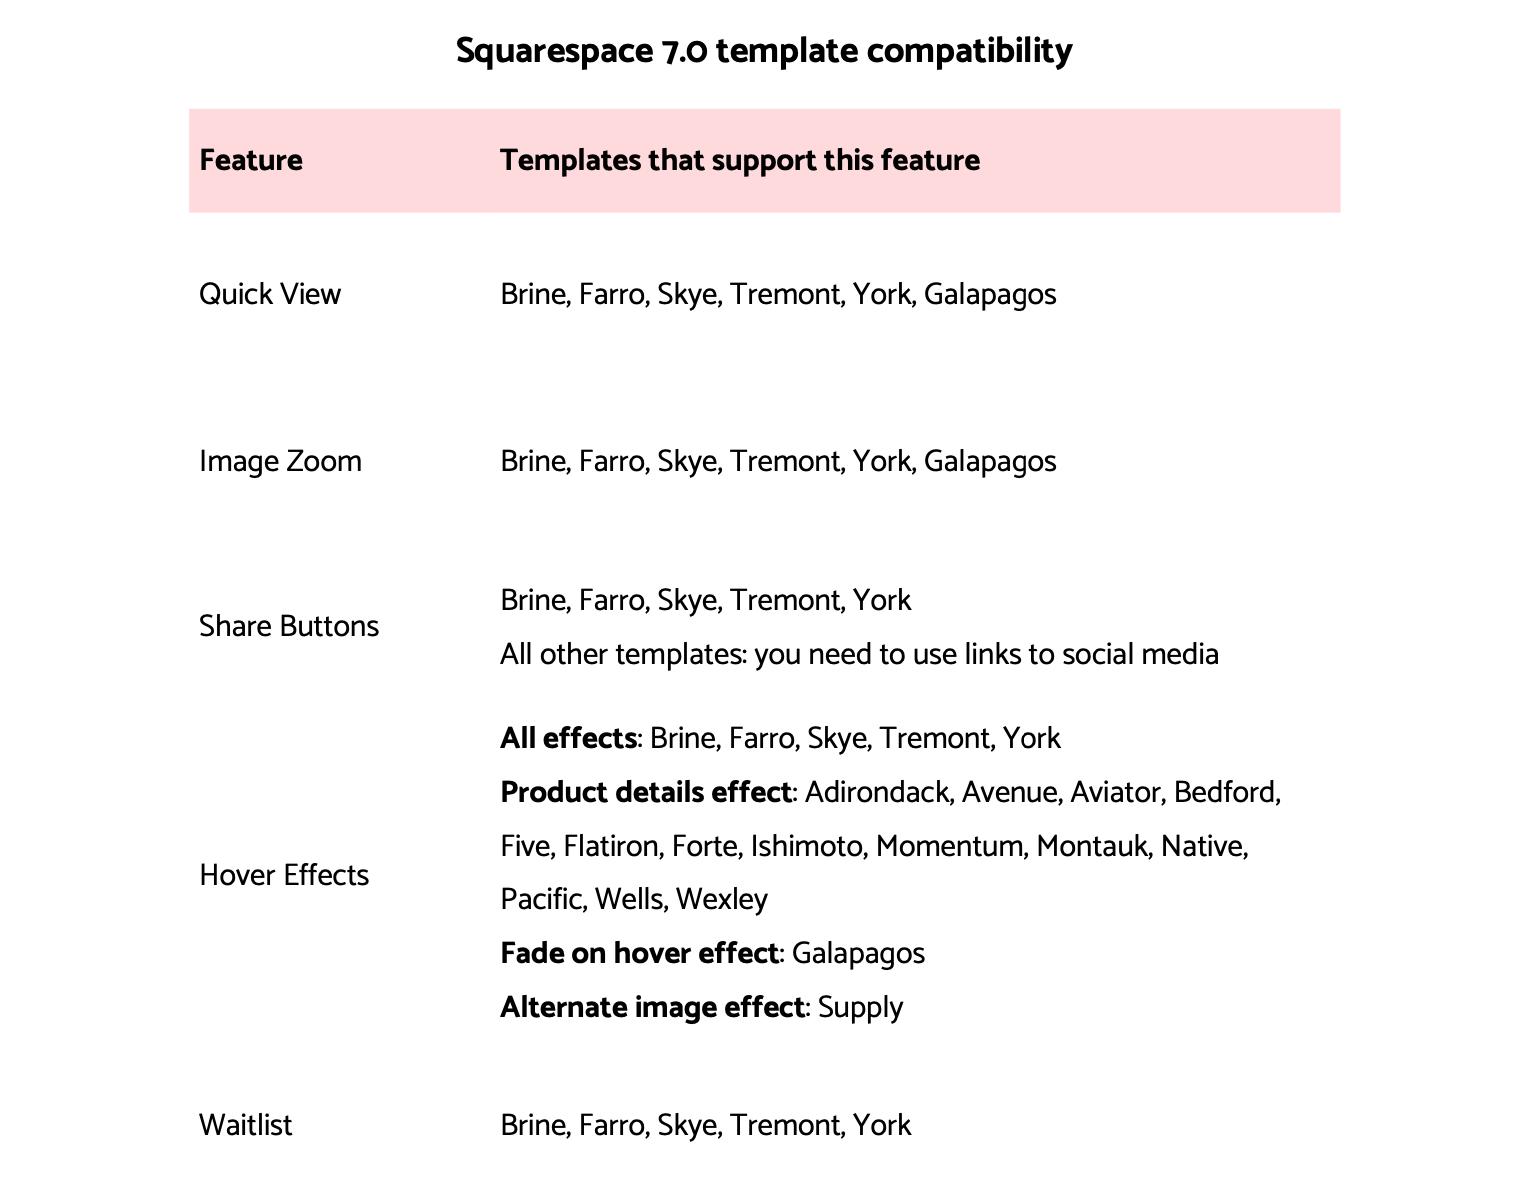
In Squarespace 7.1, you can use Quick View, Image Zoom, Alternate Image Hover Effects, and Waitlists. You can't use Share Buttons.
In Squarespace 7.0, things get a little more complicated. We've put together the chart below to help summarise what is available on which template. In summary, Brine, Farro, Skye, Tremont, and York offer the most compatibility with the special e-commerce features that Squarespace offers.
Template design
Now that you've figured out which features are must-haves for your store, you get to choose which template best matches your brand.
If you want to see our designer notes on a bunch of Squarespace templates, check out our complete guide to Squarespace's templates for every purpose.
On Squarespace 7.1, you can safely use any of the available templates – so choose the one that best fits your brand!
On Squarespace 7.0, we recommend choosing from one of Brine, Farro, Skye, Tremont, or York in order to maximize compatibility with all of Squarespace's special e-commerce features.
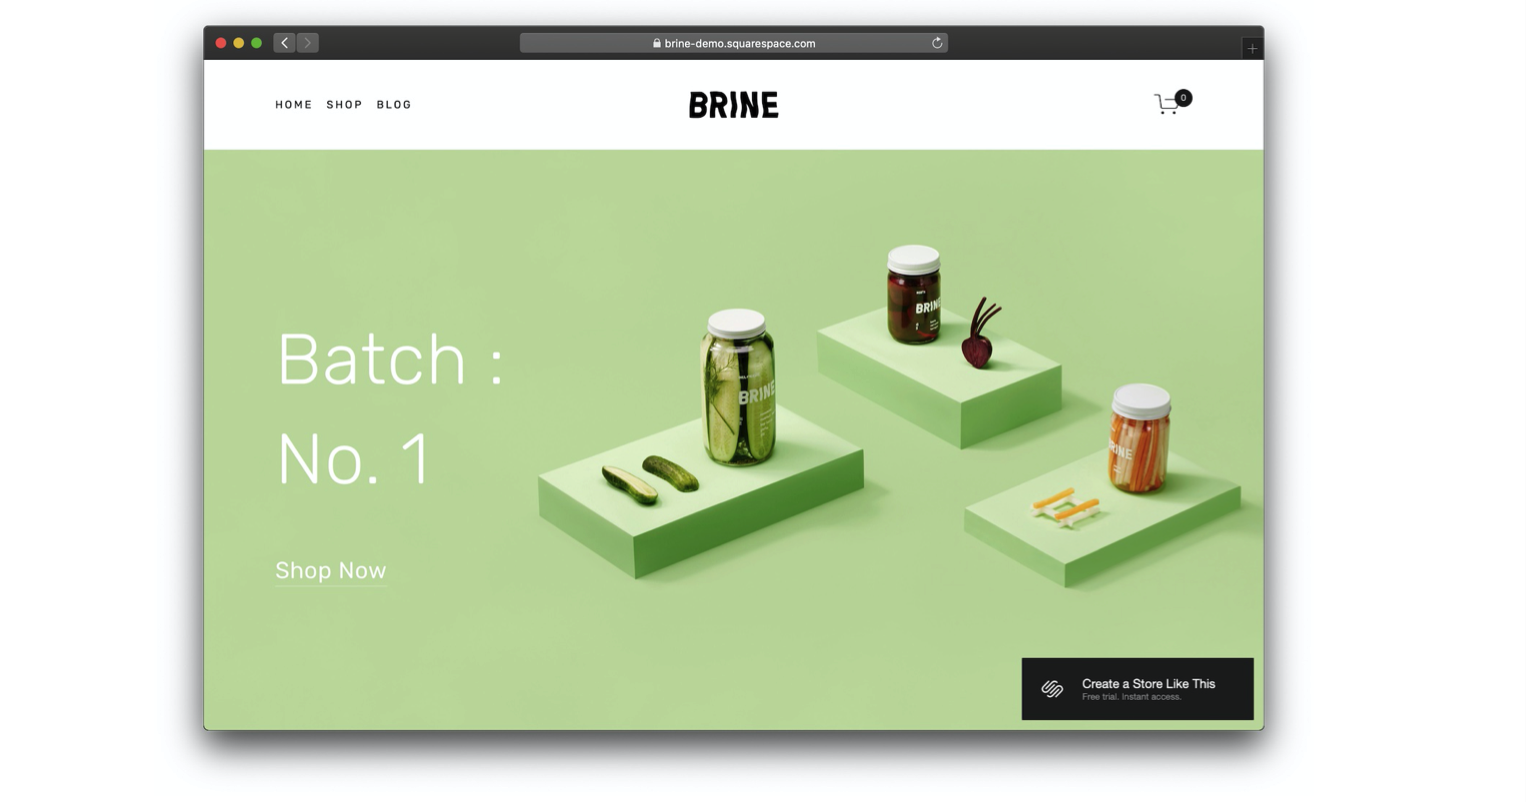
For a lot of stores, our go-to recommendation is Brine. It has all of the necessary e- commerce features, is customisable enough to fit your brand, and gives you a lot of flexibility for balancing text and images on your pages.
Getting Started – Creating Your Store
Now that you know about Squarespace's plans and templates, let's get started setting up your Squarespace store.
Since this is a modern guide for 2026, we'll assume you're using a Squarespace 7.1 template.
You can learn more about Squarespace 7.1 from our guide here. All the e-commerce features are the same across pre-7.1 and 7.1 sites. The difference is how you style your site, and how you create pages.
Create your site
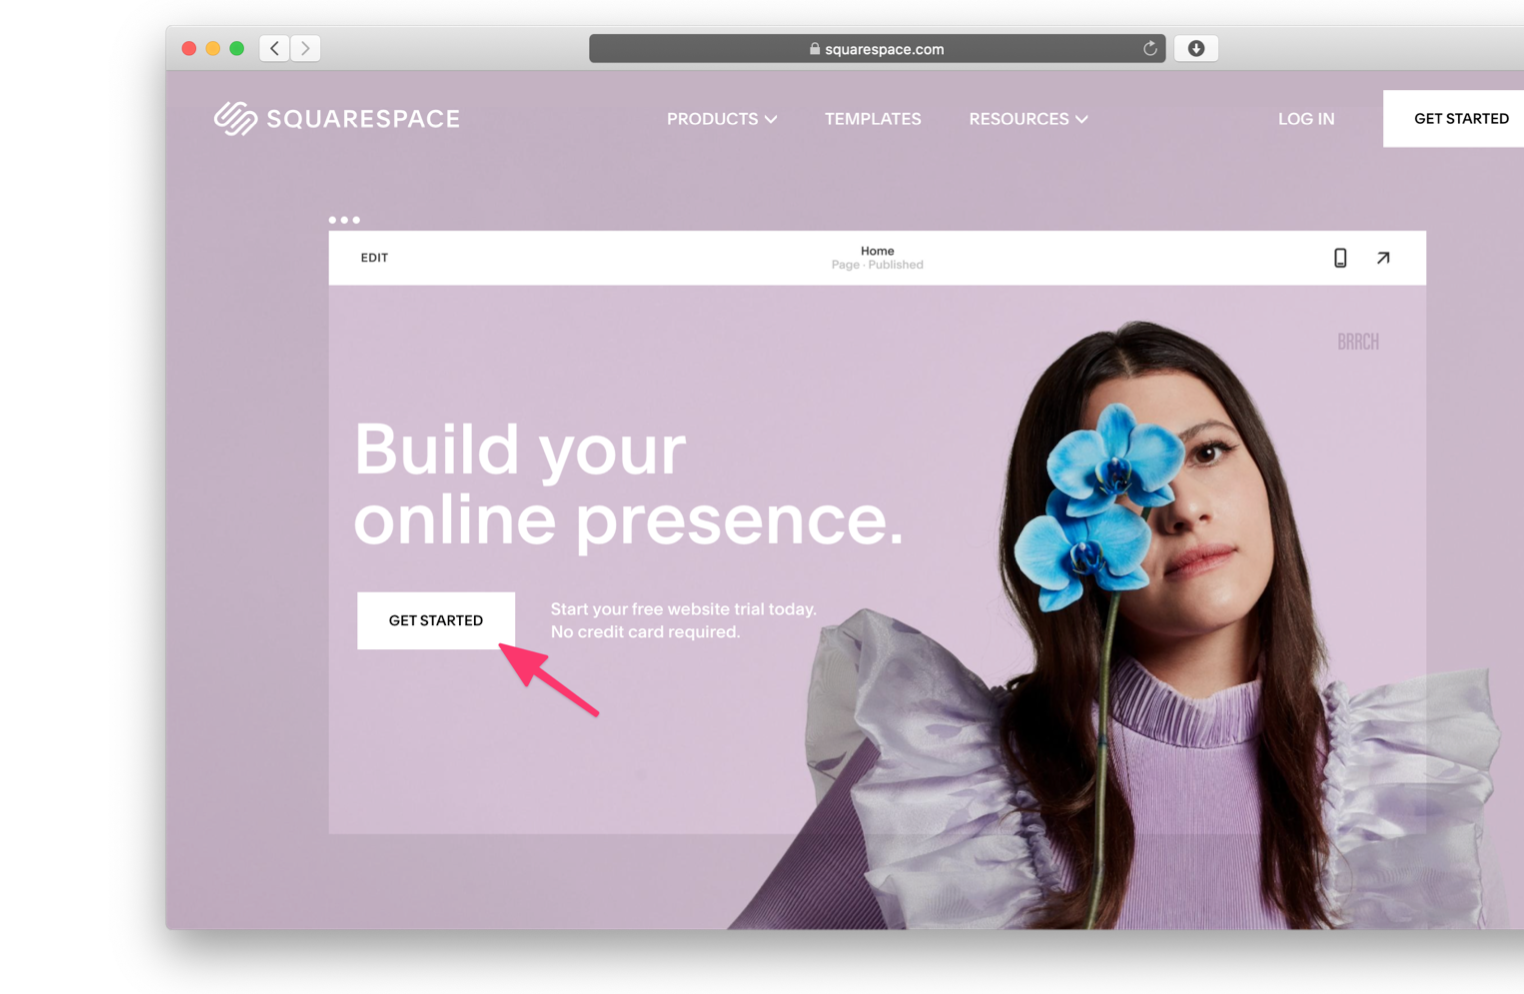
To create your Squarespace store, head to the Squarespace website. Click “Get Started.”
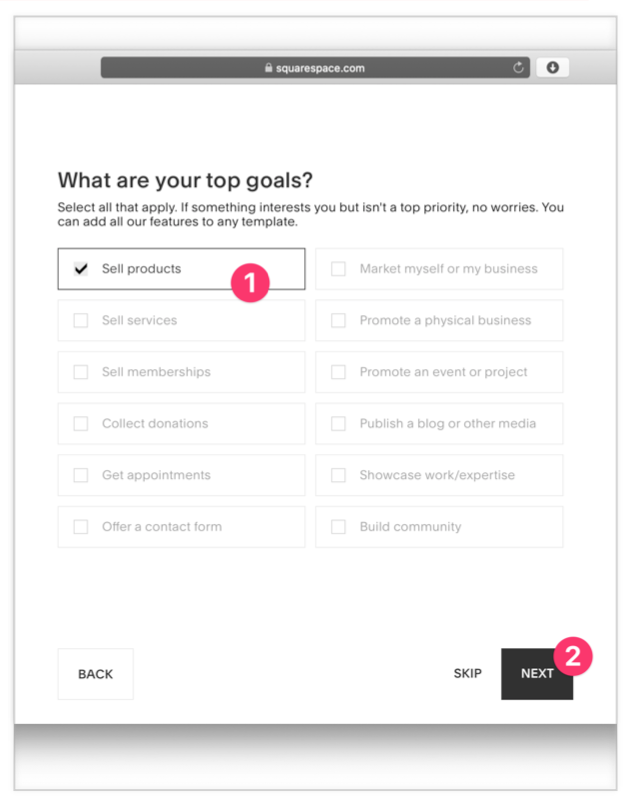 Choose your industry or enter “ecommerce” so that you'll get to choose from Squarespace's e-commerce templates. Choose “Sell products” as your goal.
You'll now be able to choose from the available Squarespace templates. Make sure “Online Stores” is selected in the sidebar so that you see e-commerce compatible templates.
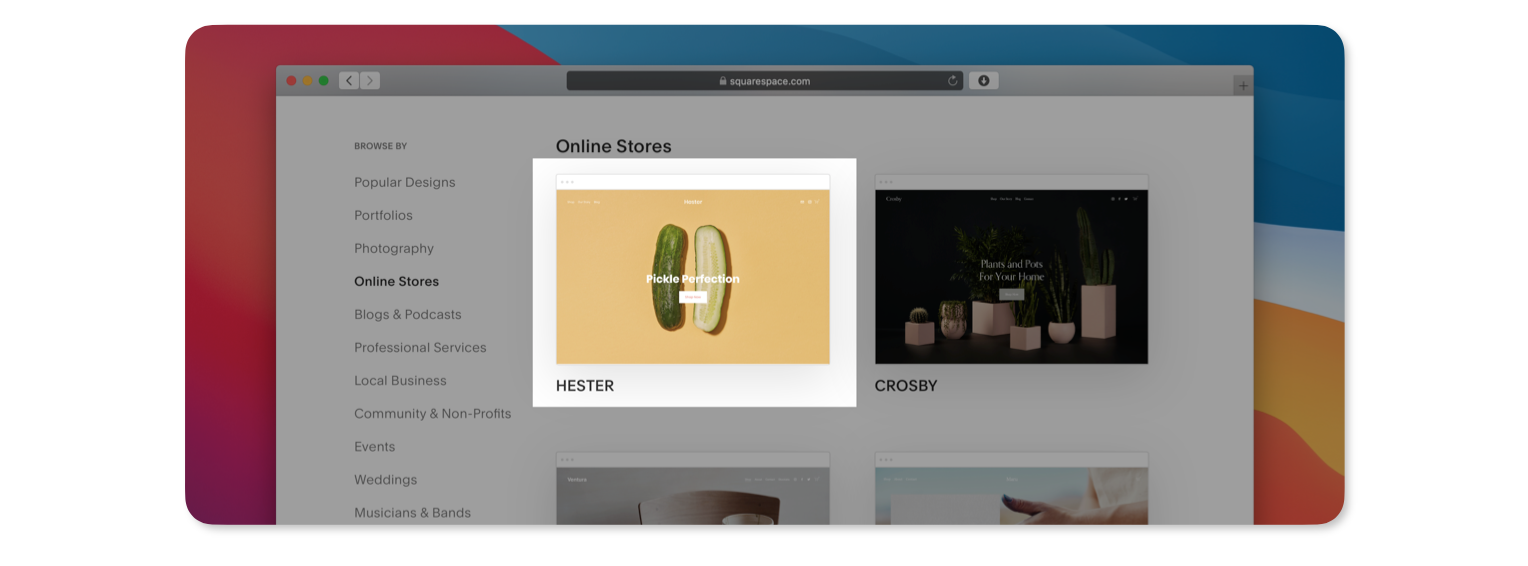
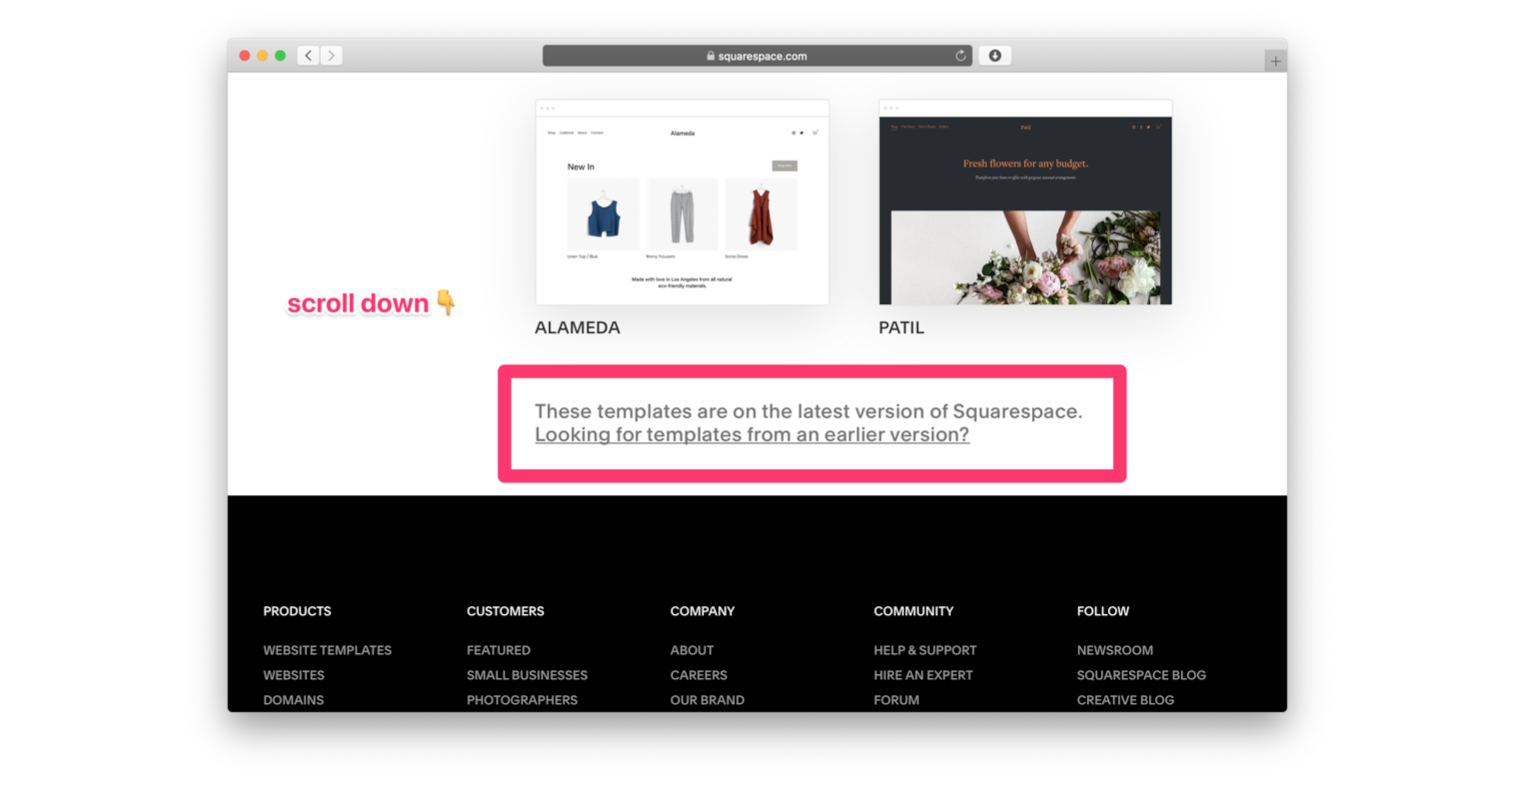
Starting from 2020, new Squarespace sites can choose from the new Squarespace 7.1 templates. All of these templates work great, but you can also scroll to the bottom to see templates available for the earlier versions of Squarespace.
Select a template that looks good to you, and you'll then be prompted to create your Squarespace account.
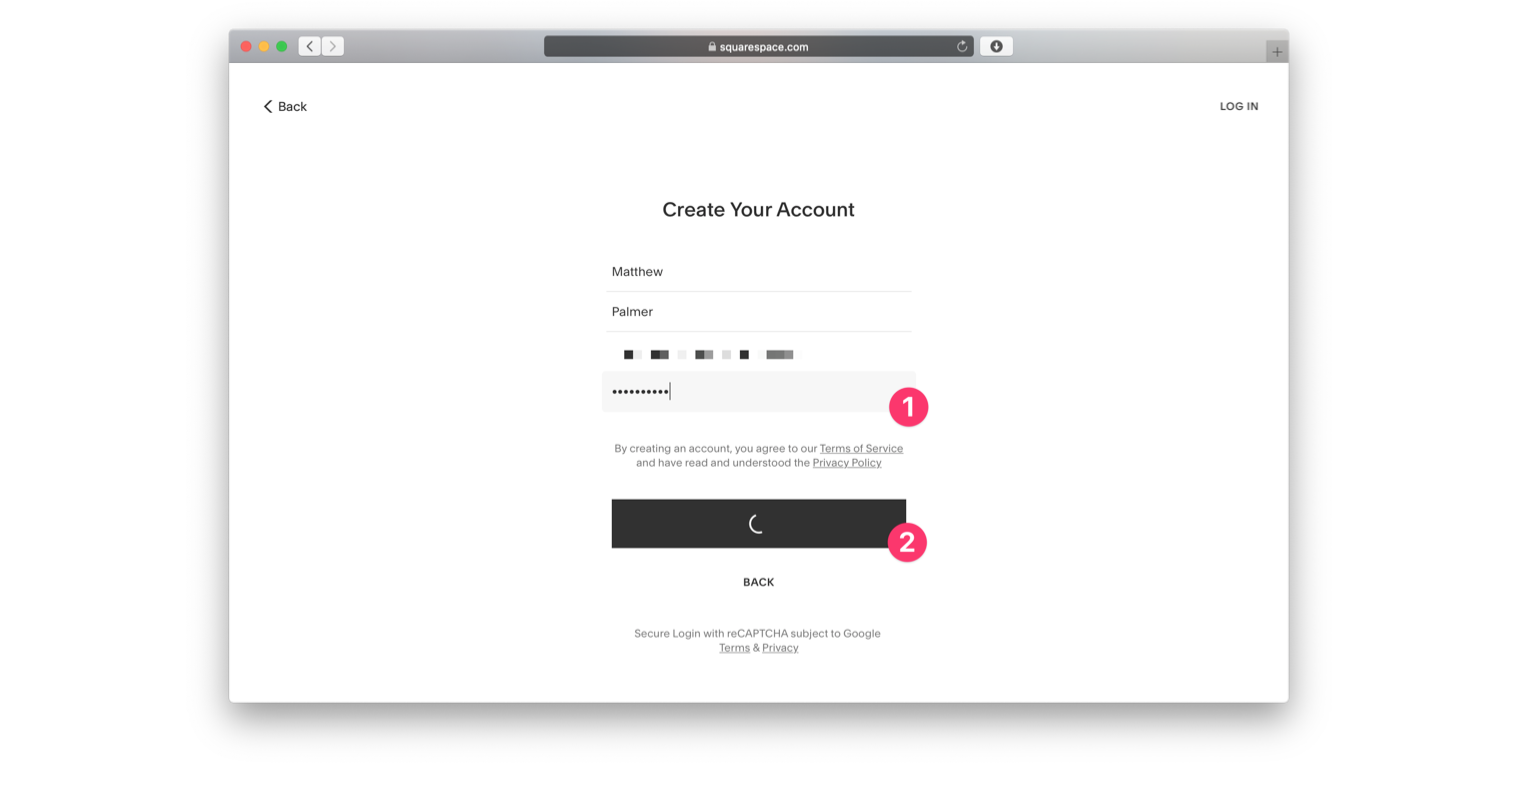
Welcome to your new Squarespace store!
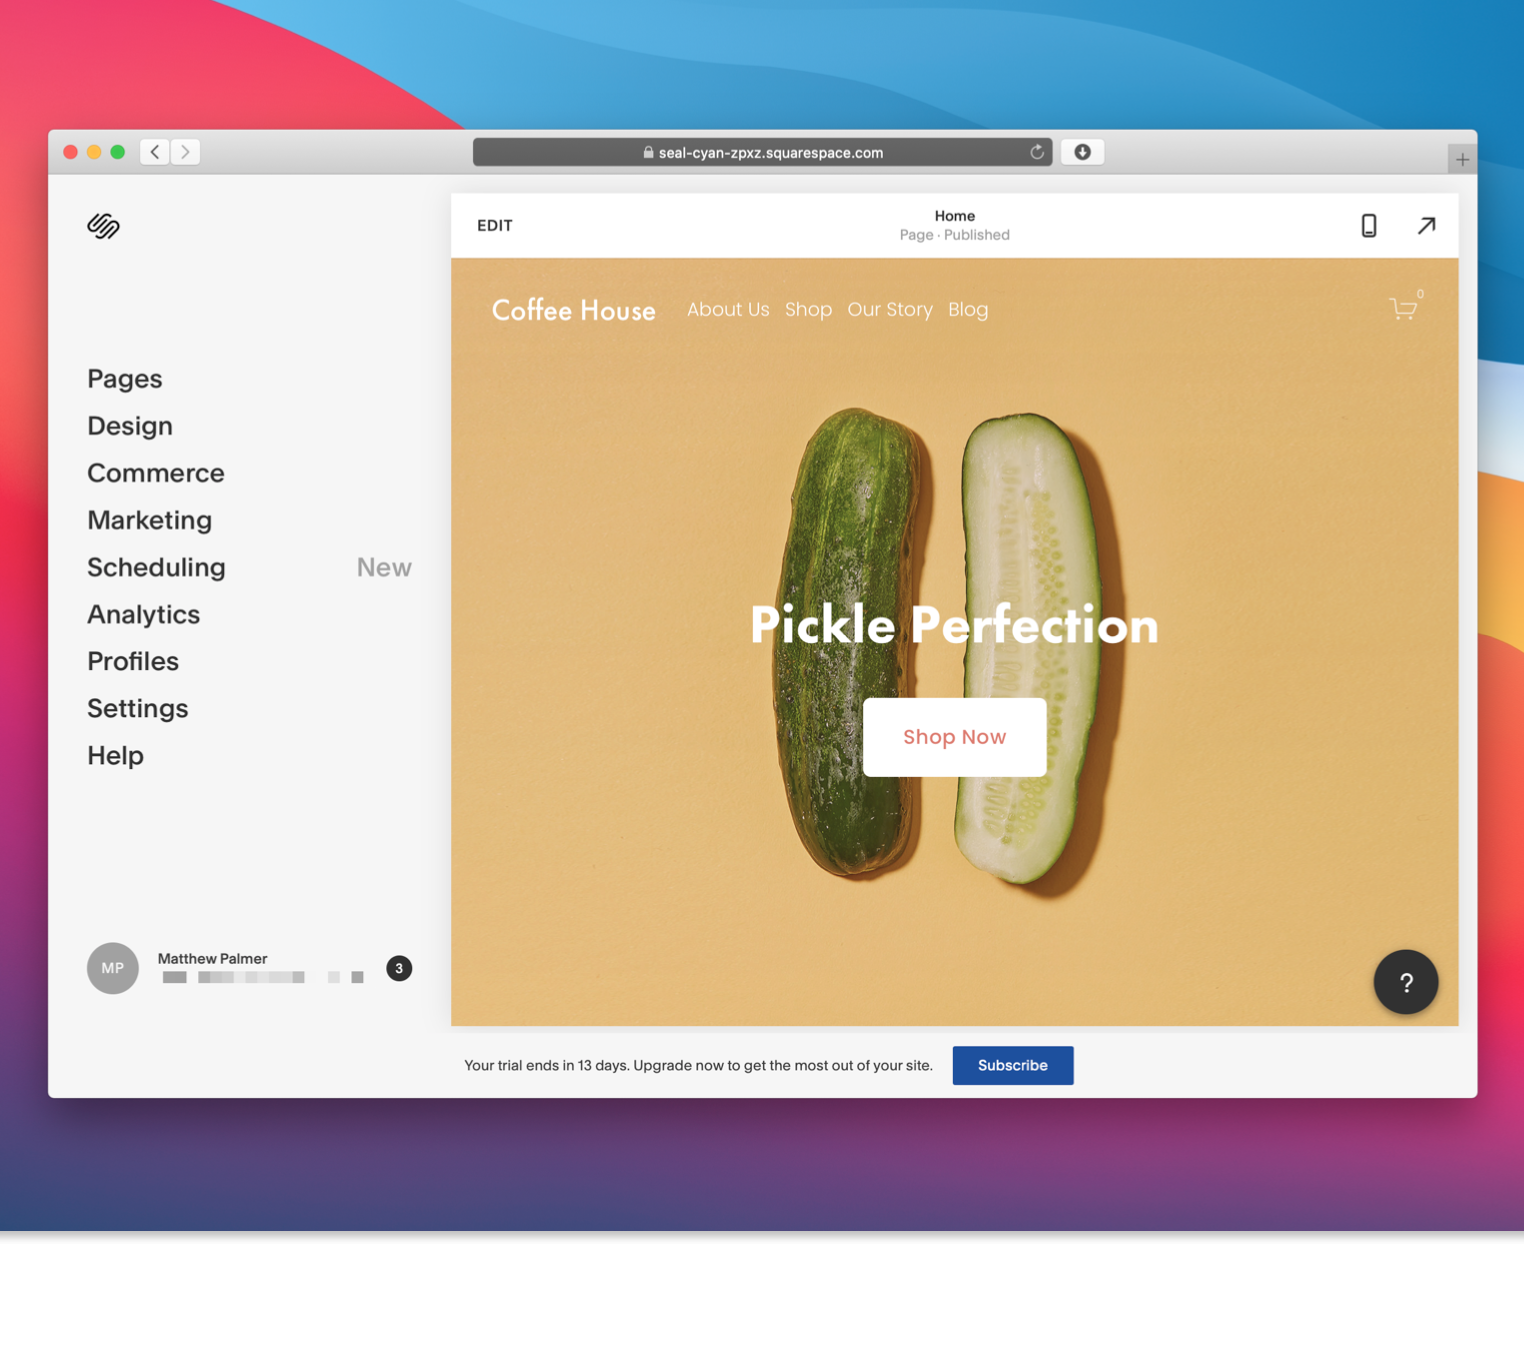
Create your first page
Let's walk through creating a new page in Squarespace.
First, click Pages in the sidebar. Then hit the plus button in the top right, and choose “Page Layouts.”
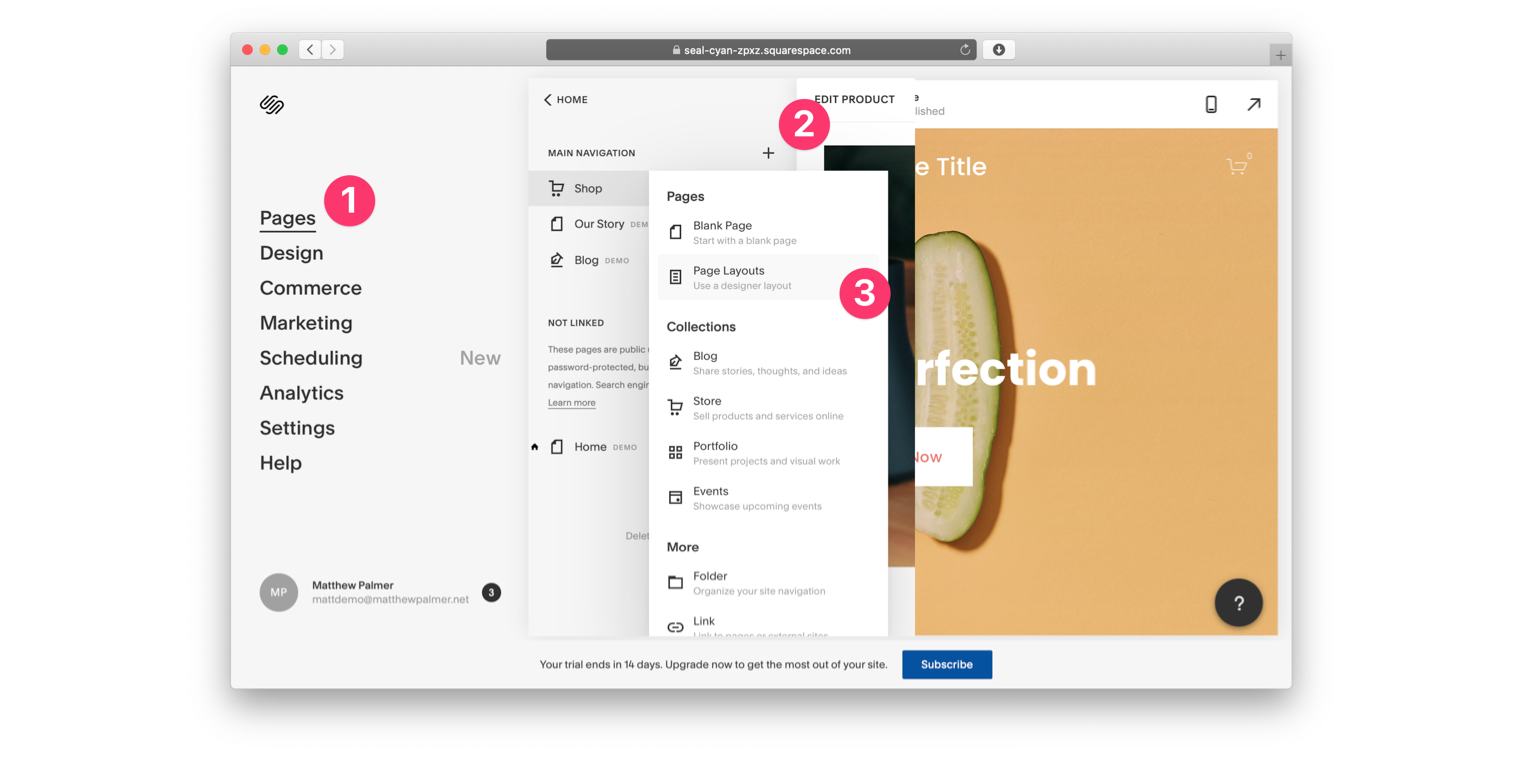
These page layouts are one of Squarespace's best features.
Instead of having to build each page from scratch, or being limited to a narrow set of generic layouts like you would with Wordpress, Squarespace has layouts built for specific purposes.
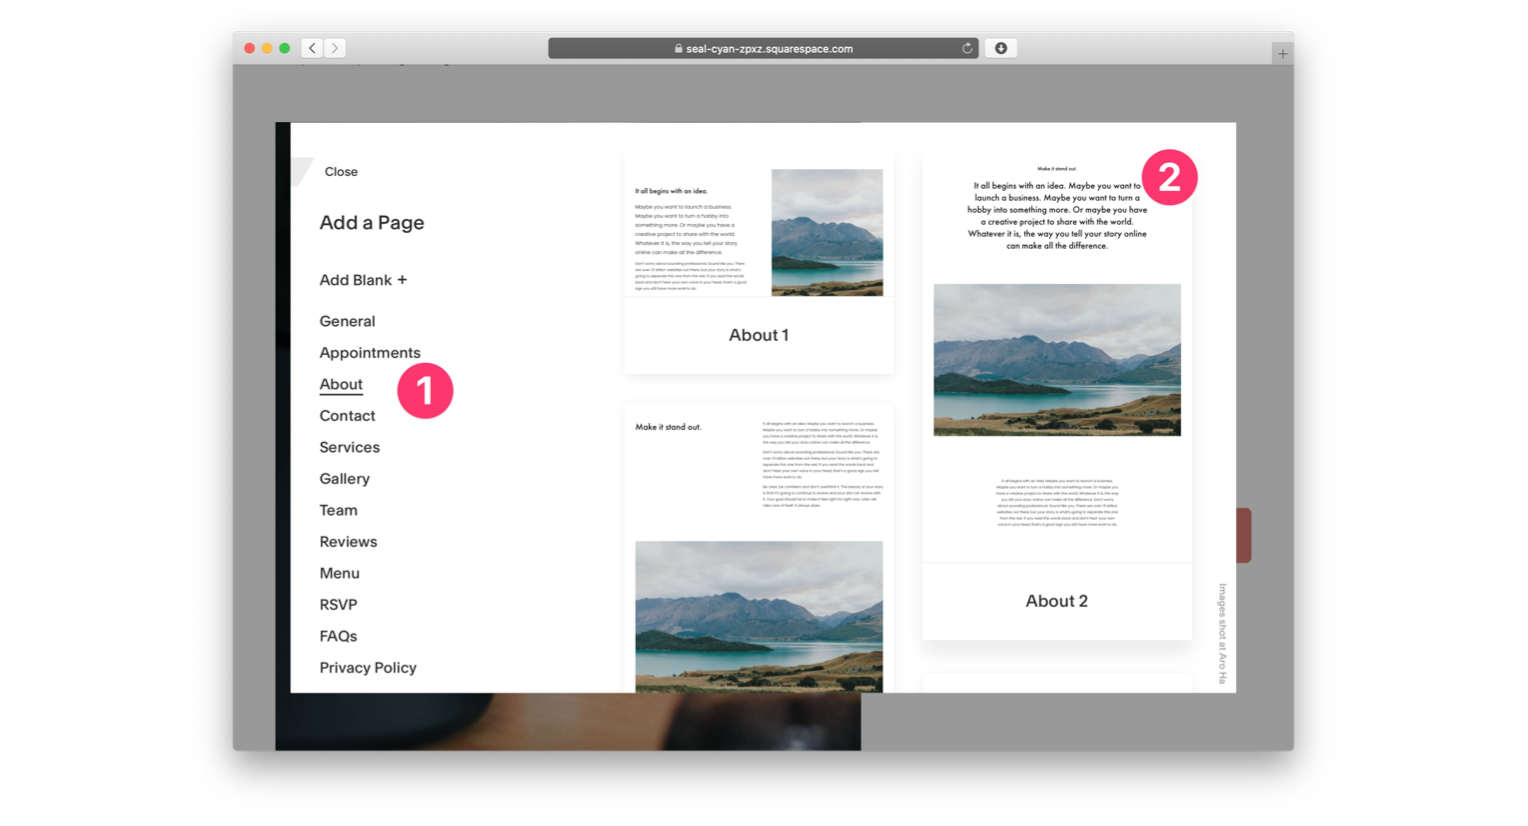
For now, let's create a simple about page. Click “About” in the left-hand sidebar, and choose a layout that looks right for you.
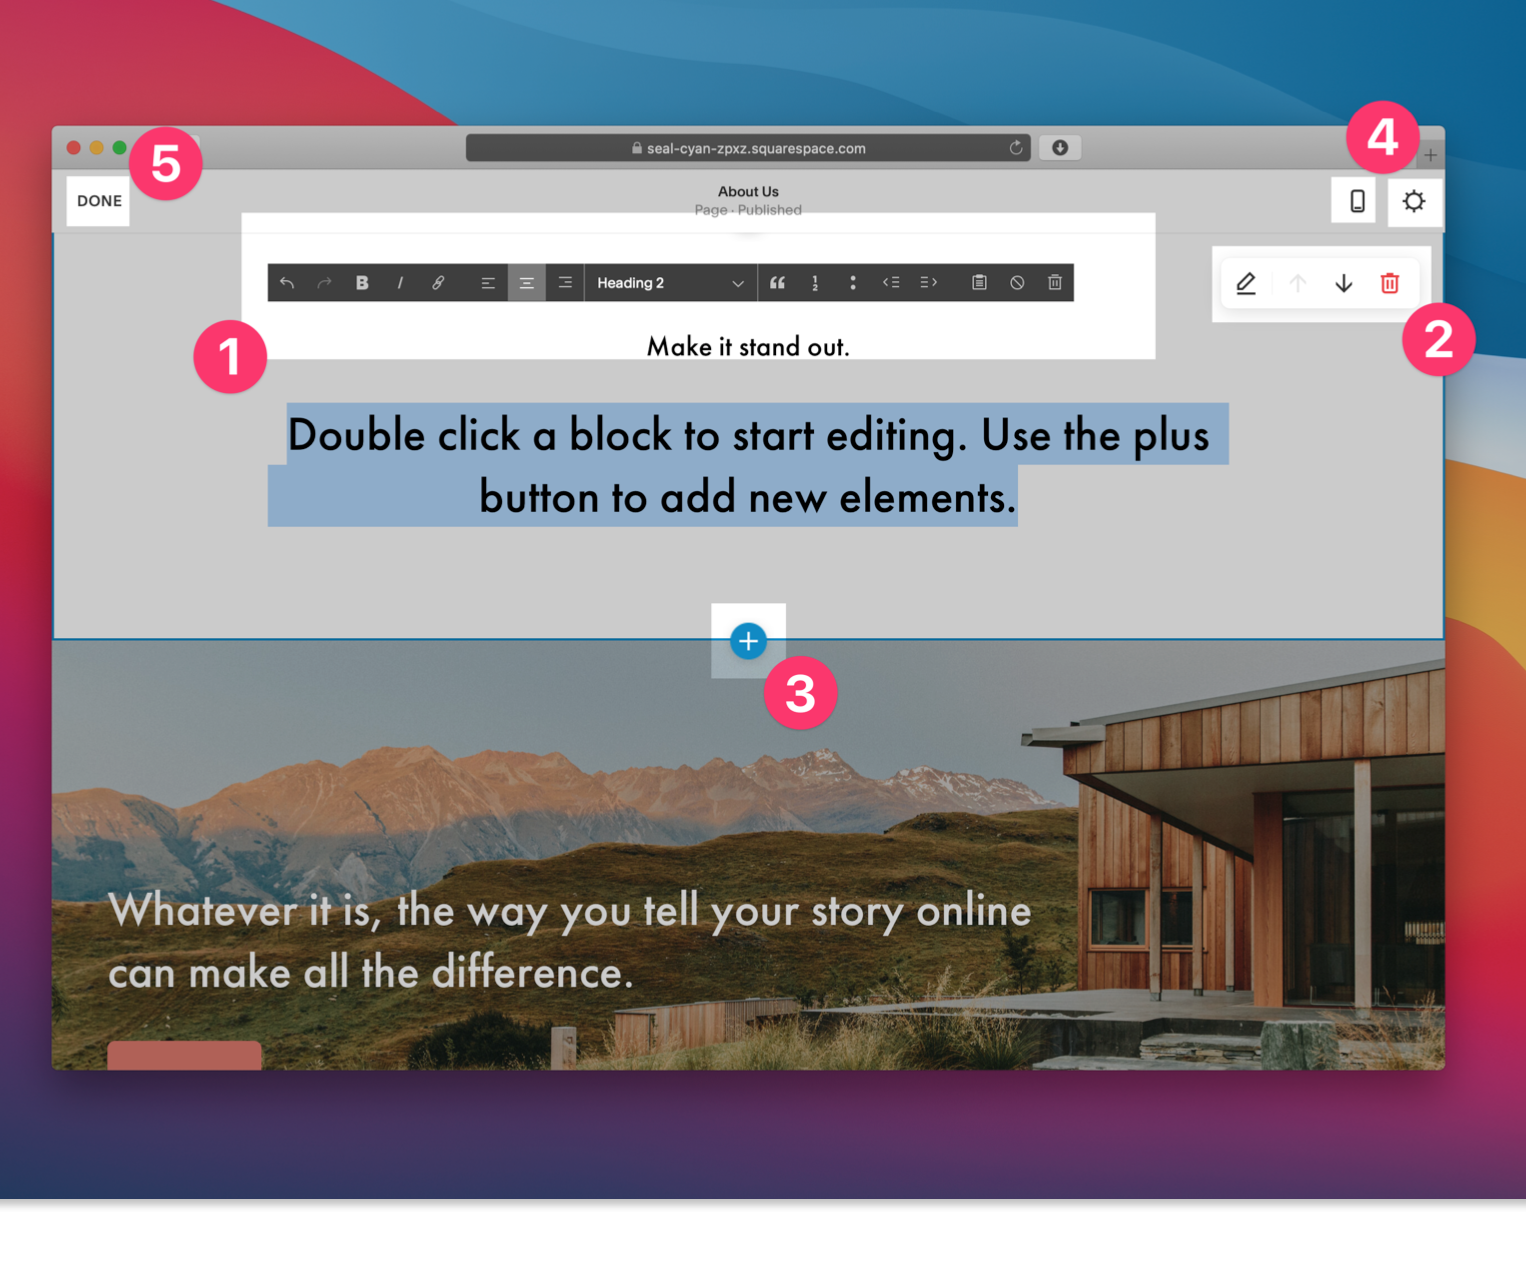
You'll be taken to Squarespace's page editor. Everything here is editable, so you can double click on any element to add text, change formatting, or drag things around. You can also add new blocks using the plus buttons that appear in the editor.
Let's walk through this UI, since it's key to getting your pages filled and looking great.
-
The active block toolbar
This toolbar lets you modify the formatting of the block that is currently selected. You've probably seen similar toolbars in Word or Pages, and this one works like you'd expect.
-
Block settings
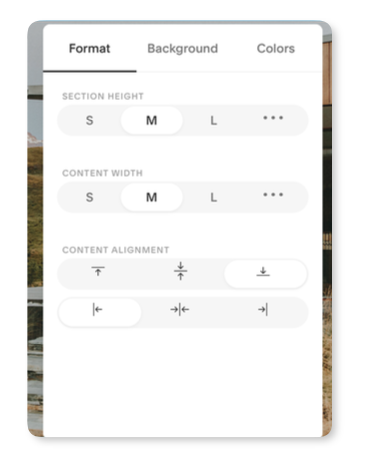 This control appears when you hover over a block. You can open the section settings using the edit icon, move the block up or down, or delete it. The section settings (pictured right) let you change the formatting at a block level
 -
Add a new section
This button lets you add a new section to your page. In Squarespace 7.1, you can choose from a range of section types, all of which are formatted to that specific purpose.

-
Mobile preview and page settings
The mobile preview button lets you see what your page will look like on a mobile device. The page settings button opens a new pop-up where you can tweak important information about the page, like its title, URL, SEO title and description, and set up page-level code injection.
-
Done/Save/Discard
Use this button to go back into to the main Squarespace dashboard, and save or discard your changes in the process.
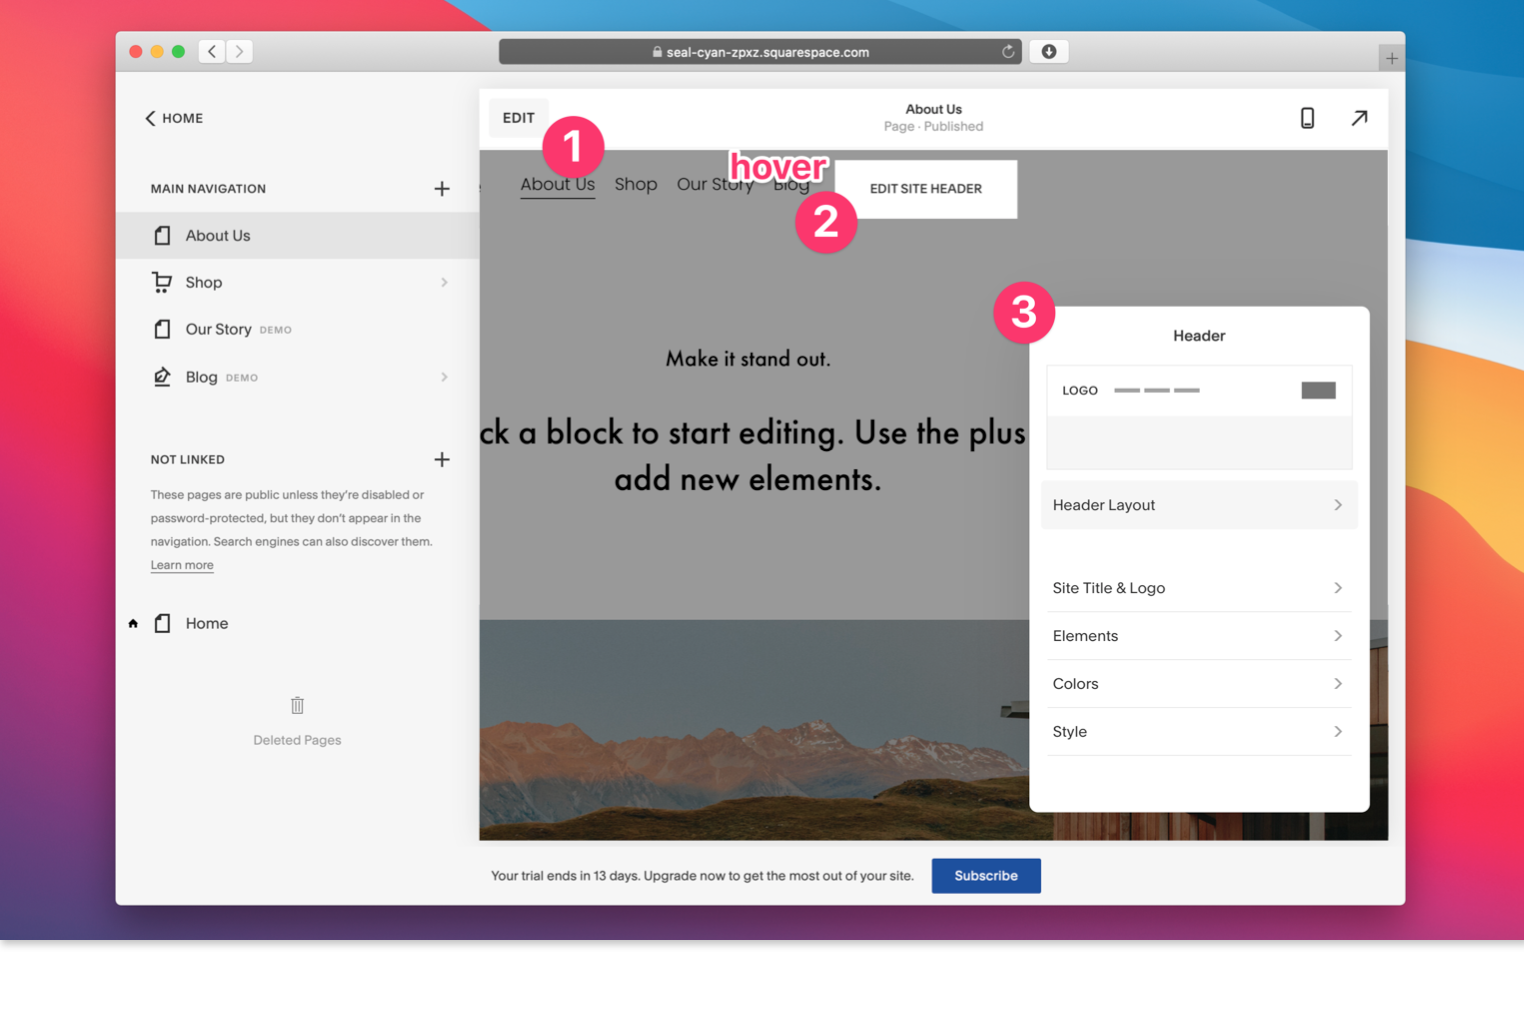
Customize your site’s header
Your site's header is shared across all the pages on your site. To customize your site header, click the “Edit” button to enter editor mode, then hover over the header section of your site, and click “Edit site header.”
That will open the Header panel, where you can tweak the layout, title, colors, and styles of your header.
Customize your site’s styles
In Squarespace 7.1, it's really easy to customize the design of your site, and to make changes to all the elements of your site in one place.
To tweak your site's styles, head to the “Design” section, and select the element you want to customize.
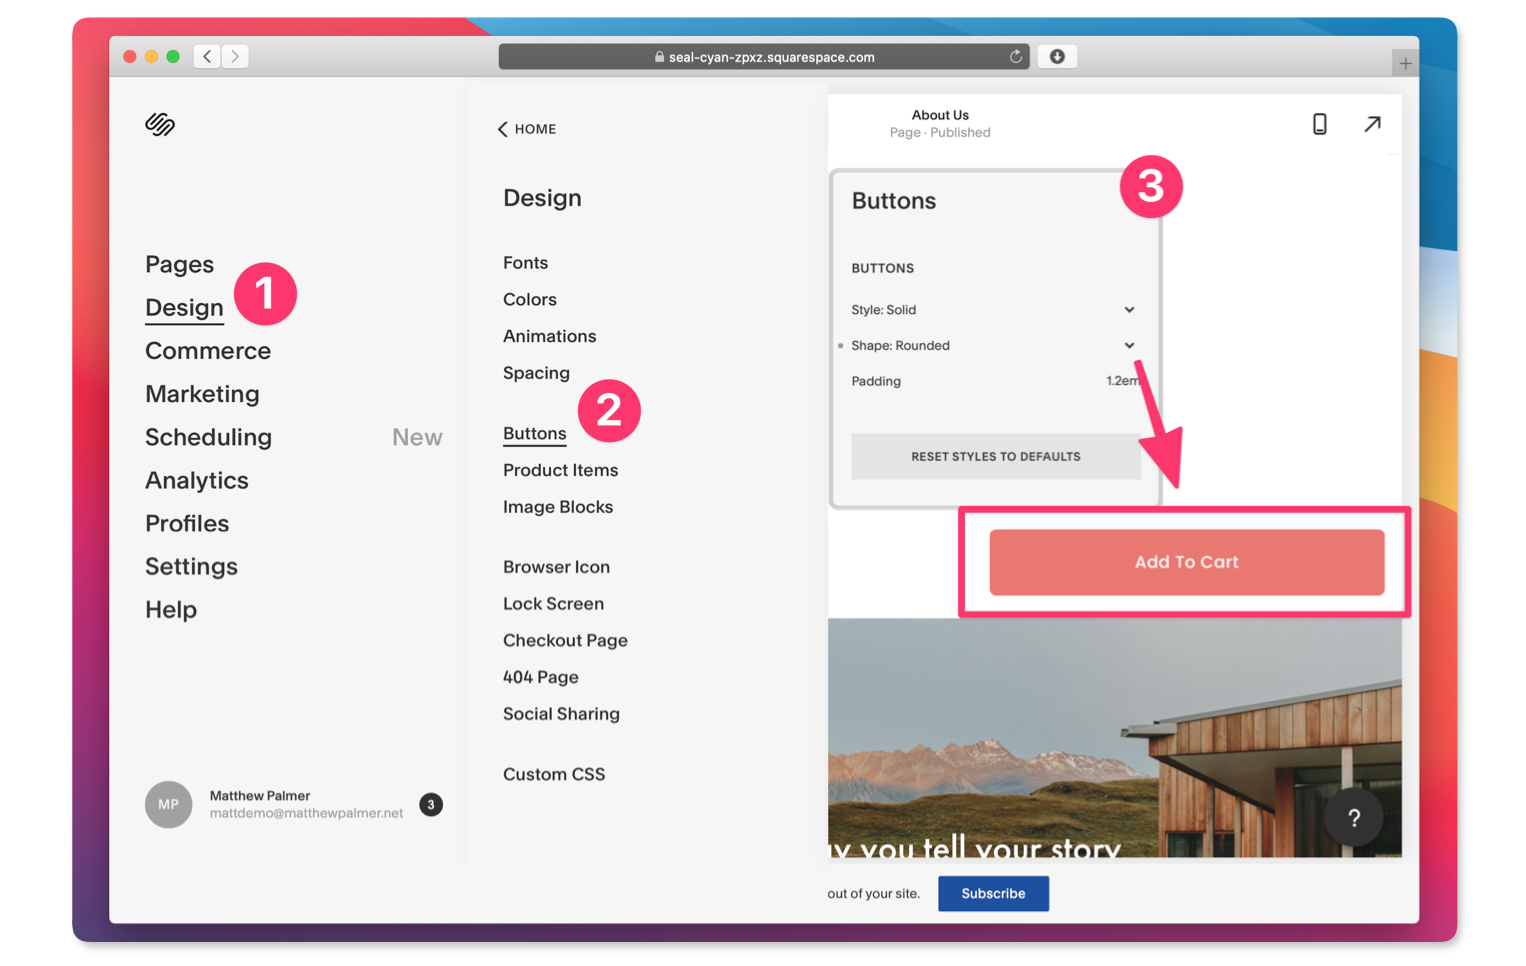
After that, make changes to the item. Changes you make here will be reflected across the entire site, which is a huge time-saver compared to having to change each button individually.
Create your first product
Let's create your first product in Squarespace.
It's a bit weird – to create a product, you start as though you're creating a new page. Click “Pages,” select the “Shop” category, and click the plus button to create a new product.
Then you’ll be prompted to choose a product type. Squarespace supports physical products, digital products like e-books and videos, services, and gift cards (on the Commerce Advanced plan).
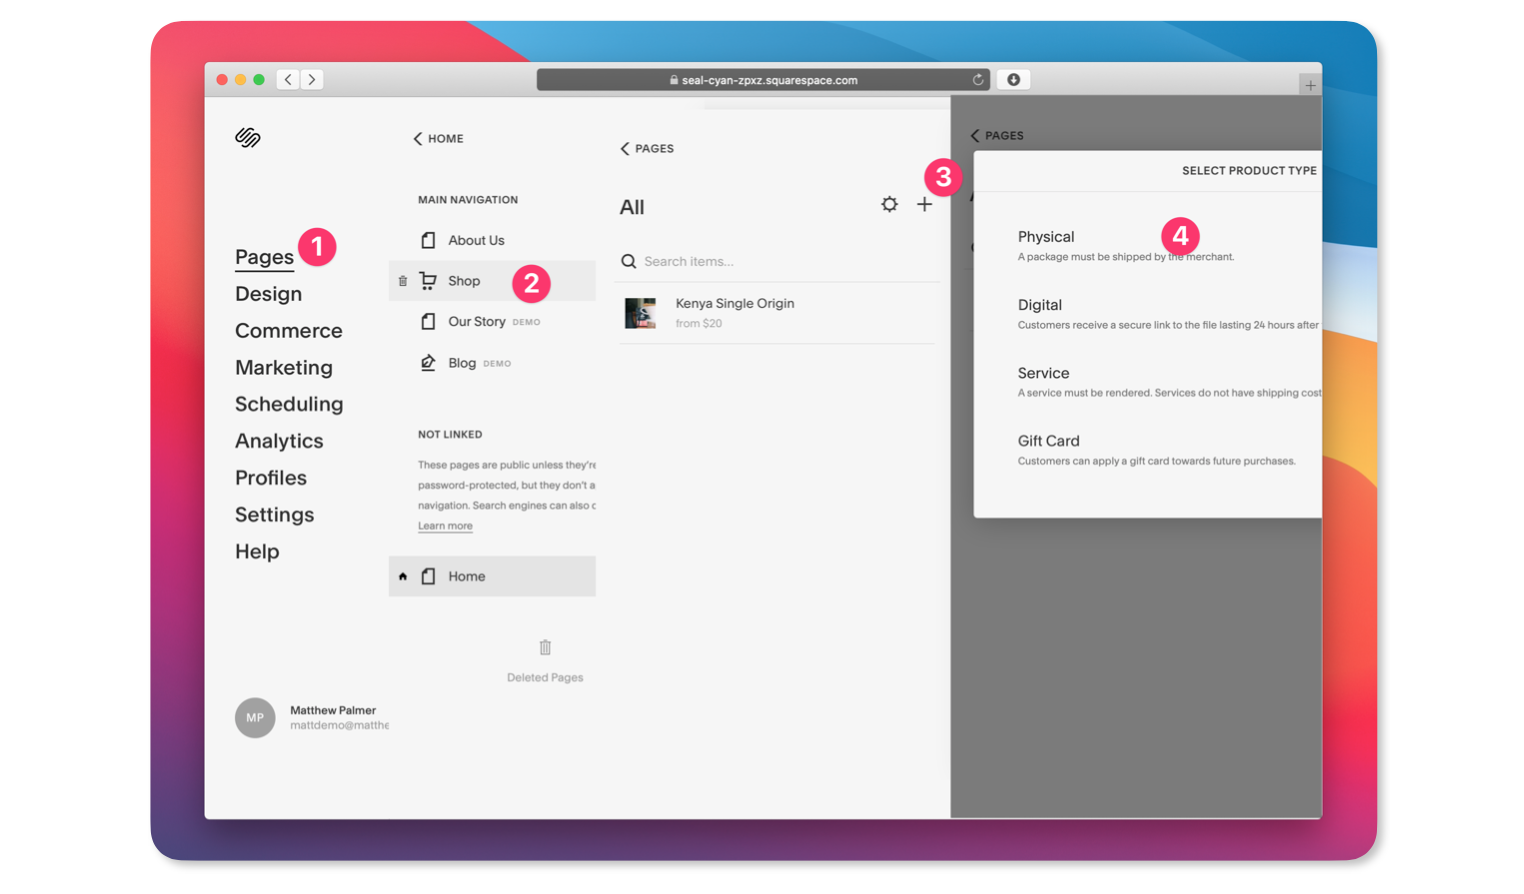
For this example, let's choose the Physical product type.
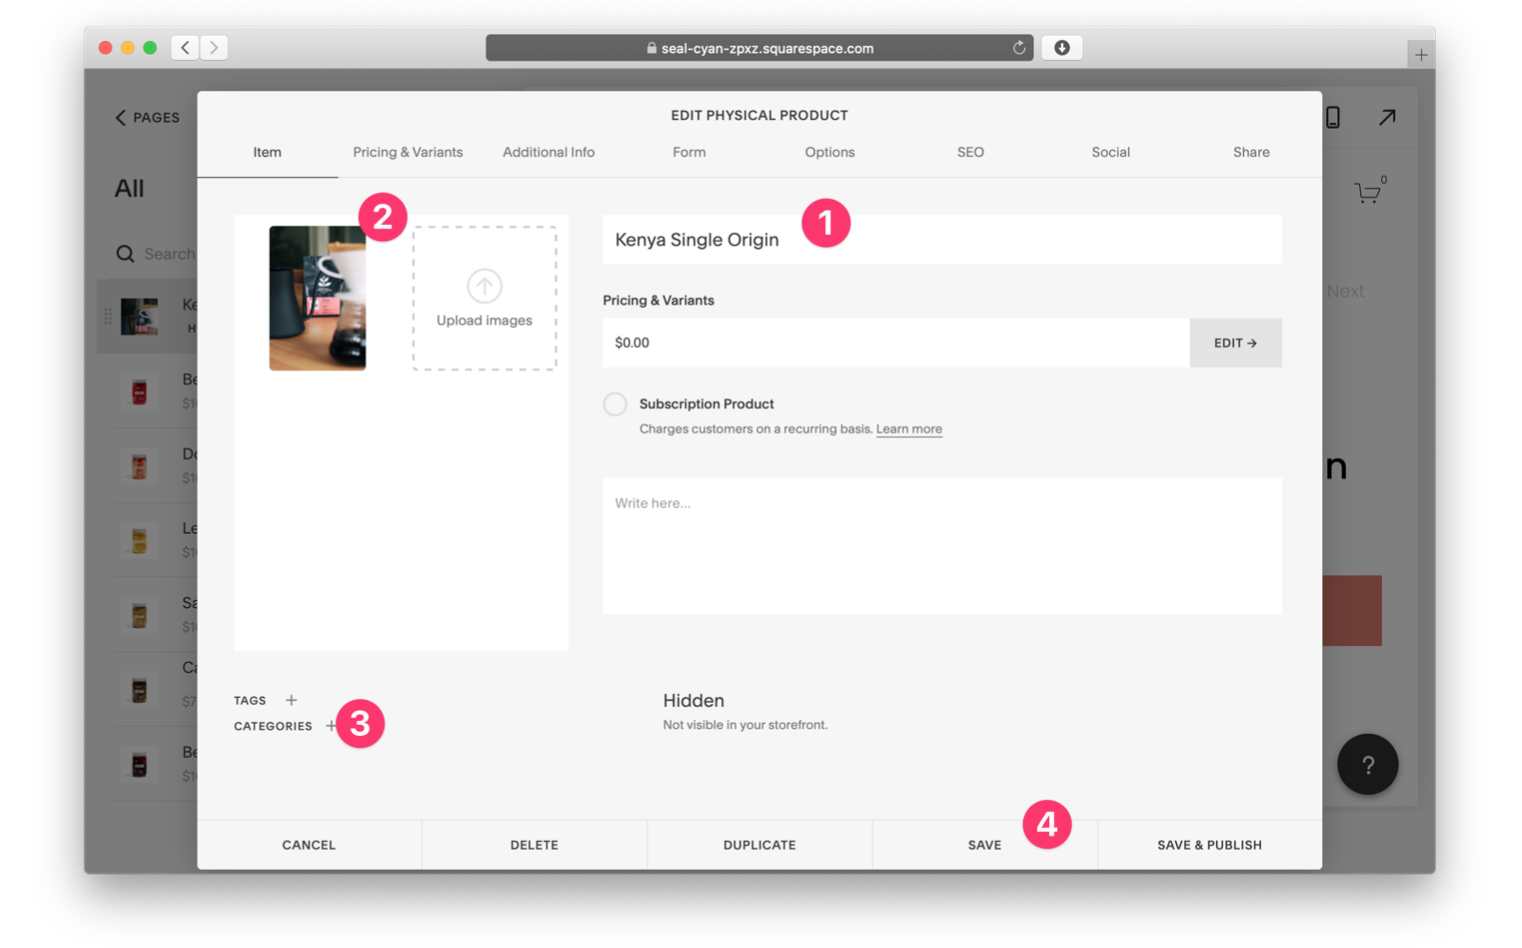
When you create your product, you'll need to set up some basic information.
- Add the product name
- Upload your product images
- Add product categories (optional). This helps with navigation on your site, and if you want to restrict discount some of your discount codes to only apply to a specific category.
- Click “Save” to keep your product private, or “Save & Publish” to make your product live on your site. This will add the product to your site’s navigation and search.
Now, let's set the price for your product. When you click to add a price on the “Pricing & Variants” field, it takes you to the “Pricing & Variants” tab.
In this tab, you'll be able to set up different SKUs for your products based on the various options that your product has available. For each SKU, you can set a different price, shipping information, and product options.
Let's walk through an example for our bag of coffee beans above. We want to offer the product in the 250g, 500g, or 1kg option.
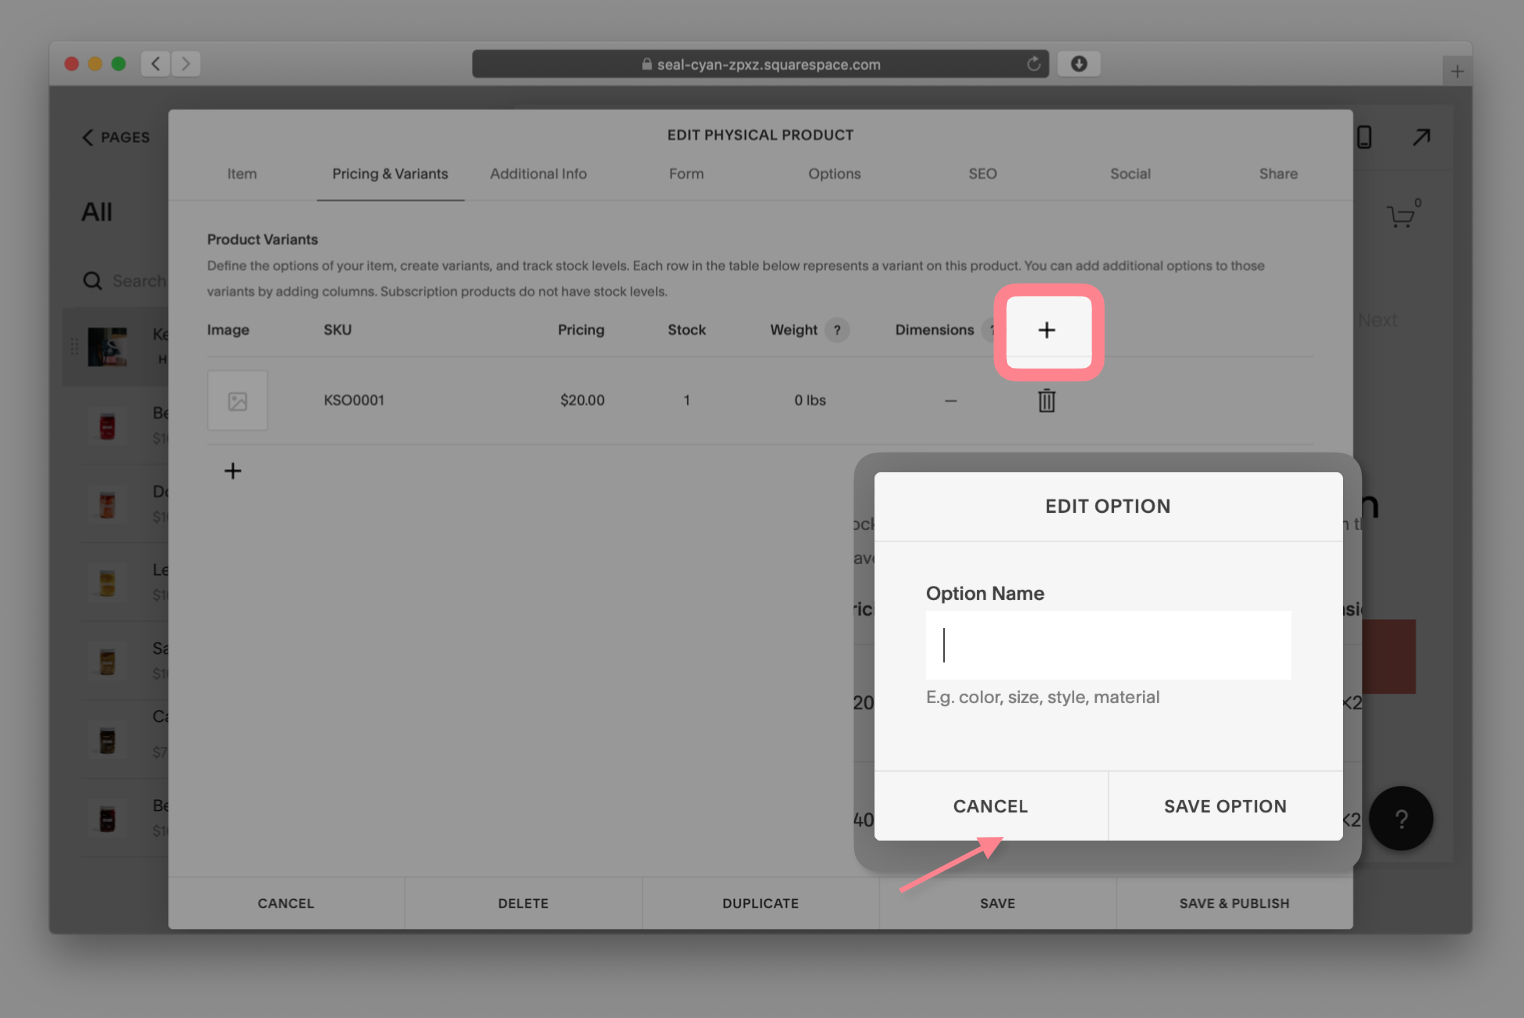
To set this up, we need to add a “Size” option to the product options list.
Click the plus button on the right hand size of the product variants table. This will open a pop-up where you can enter the name of the option.
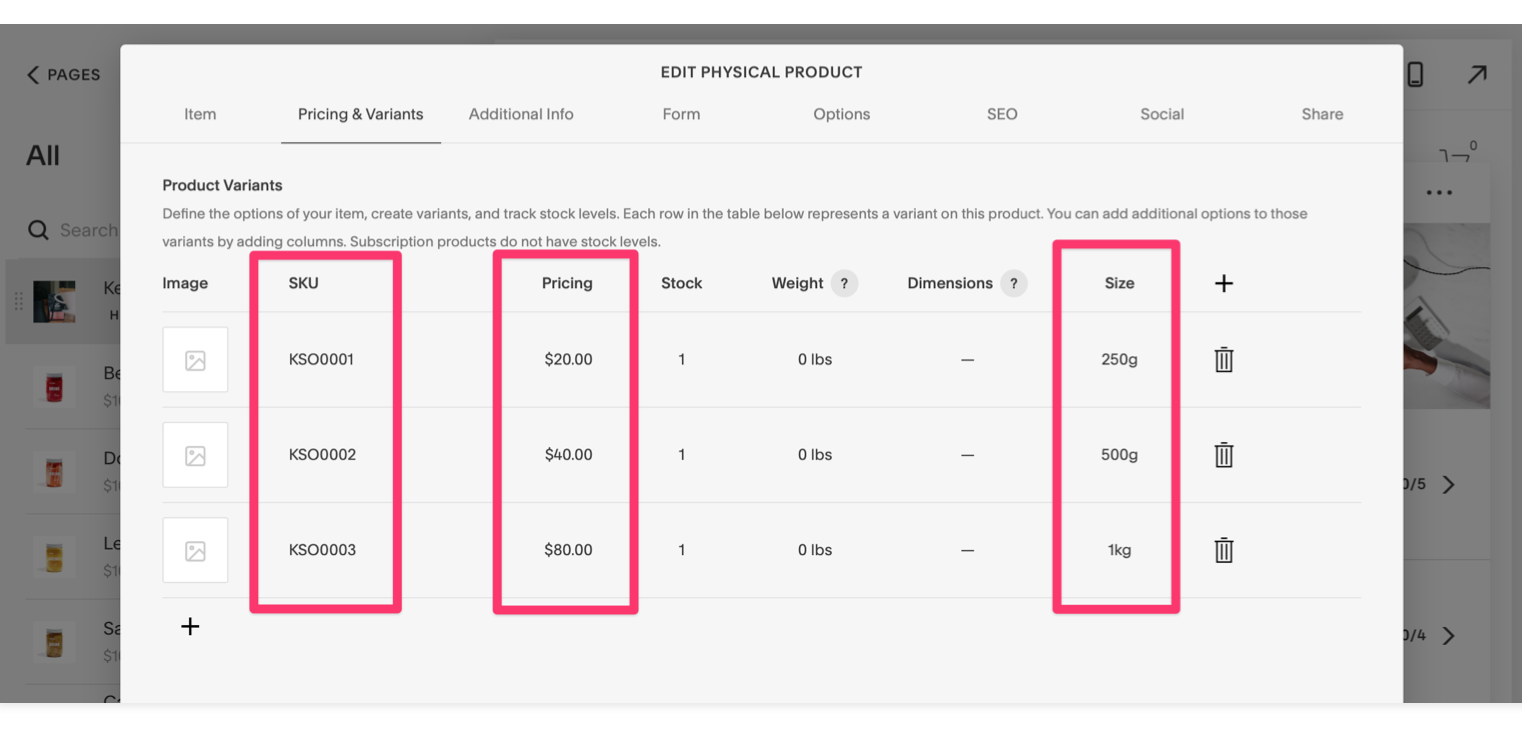
When you add a new option, you can add an SKU for each of the potential values of this option. For example, we'll have three variants of our coffee beans for the three possible values of the Size option.
Notice in our example that we have a separate SKU for each size of our product, and that each SKU can have its own price set.
Once you've added that basic information, you can also set the number of each item in stock.
This will automatically decrease when an order containing this item is fulfilled.
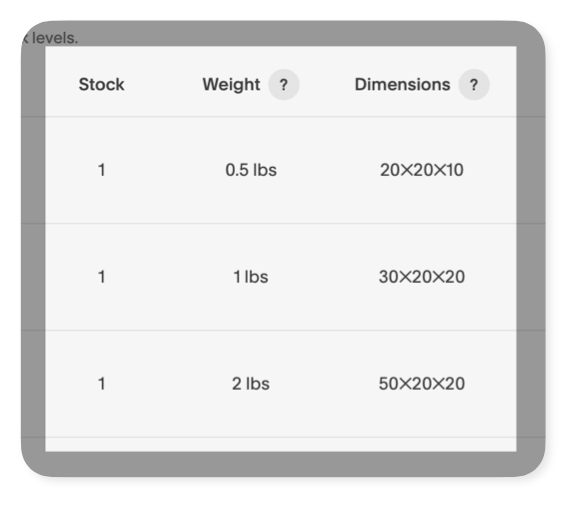
Then, set up the weight and dimensions for this product variant.
When you set up your store to use automatic shipping calculations at checkout, these values are used.
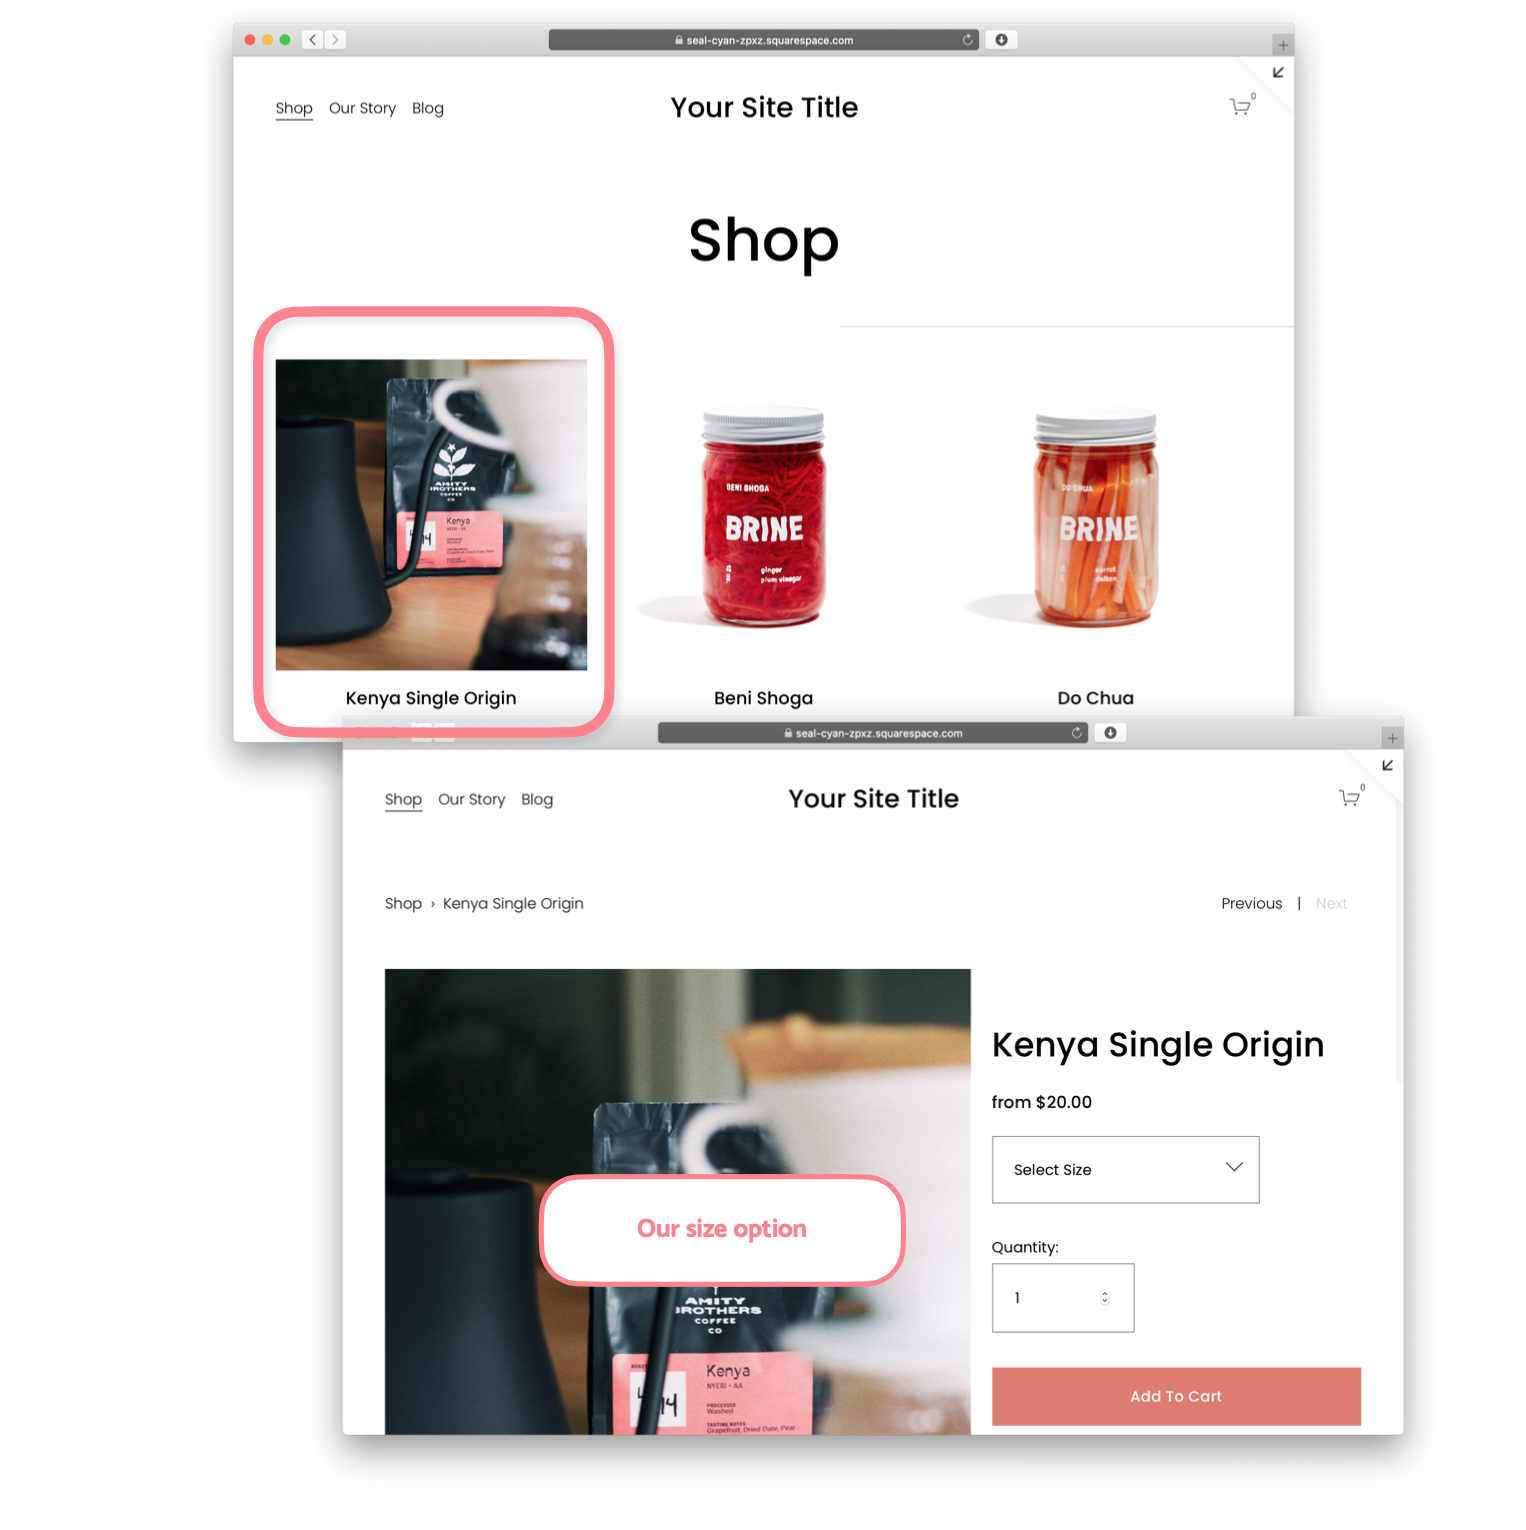
Now you'll be able to click “Save & Publish” to make your product available.
Let's go take a look at our new product on our Squarespace site.
Connecting e-commerce functionality
Now that you've got products set up, the next step is to set up some key e-commerce functionality so that you can collect payments and ship your products.
Connect your payments service
Squarespace supports several third-party services for processing payments when your customer goes through checkout on your store.
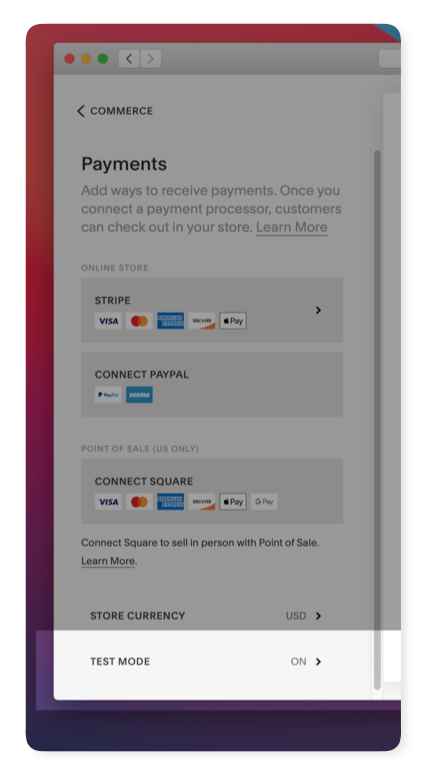
To set one up, select “Commerce,” then scroll down to “Payments.”
These payment services have slightly different pros and cons. We'd recommend adding both Stripe and PayPal to maximize the likelihood that a prospective customer will be able to make payments.
-
Stripe
Stripe is pretty much a necessity for all stores. It's what you'll use to accept debit and credit card payments, plus Apple Pay.
-
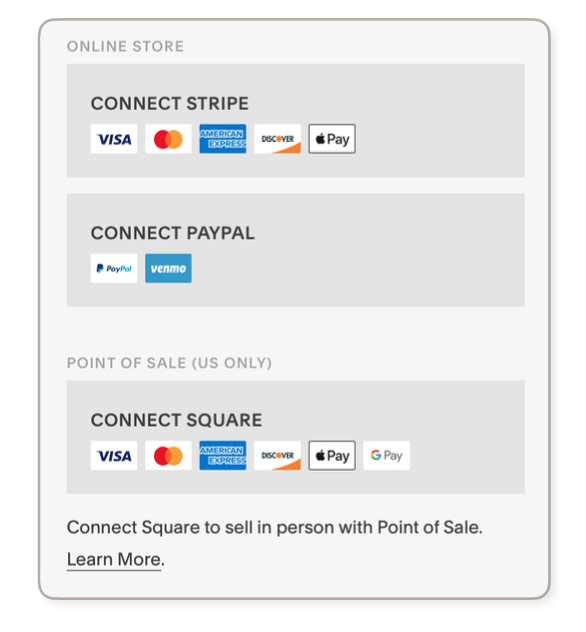
PayPal
PayPal is a widely used method for transferring money and paying for things online. Some customers prefer it because it allows for faster checkout. PayPal does have fairly high fees, so factor that in if you decide to connect it.
-
Square
Square helps businesses accept payments in person using card readers. If you're in the US, and you have an in-person business, add your Square details to integrate your PoS system with your online store.
Add shipping options
If you're selling physical goods, you need to set up your shipping options.
Customers really like free shipping. If you have standard item sizes, we recommend offering free shipping for orders over a certain amount.
Squarespace offers a range of shipping calculation options. Which option is correct for your store is affected by:
- Your location
- The size and weight of your items
- Whether each of your items are mostly the same size
- Where your customers are located
You have several options for how shipping gets calculated for your orders, including:
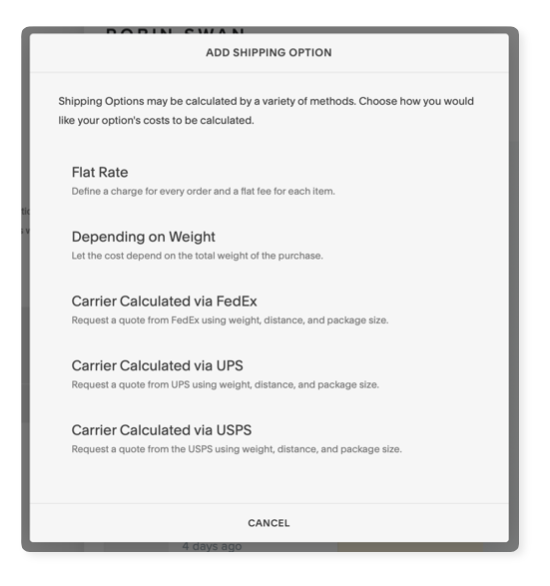
Free shipping, where shipping is free for all orders
Flat rate, where there is one rate for all items and orders
Calculated by weight, where you set up formulas for calculating shipping costs based on the total weight of the order
Carrier calculated, where you'll use the FedEx, UPS, or USPS formulas to automatically calculate the shipping costs based on the weight and size of your items
Our recommendation
Our preference ranking of these shipping options is:
- Free shipping
- Flat rate
- Carrier calculated (US only)
- Calculated by weight
We really like using free shipping whenever possible. Why? Customers love it. People hate having extra costs added on at the end of their order. The first thing you'll need to do is raise the cost of your products to factor in the cost of shipping.
Domestic stores
If you're shipping only within your origin country, or your items are all largely the same size, we recommend offering free shipping.
One solution we really like is to use flat rate shipping, but offer a free shipping discount for orders over $50. This really incentivises customers to increase their order size, while also gives them something they want.
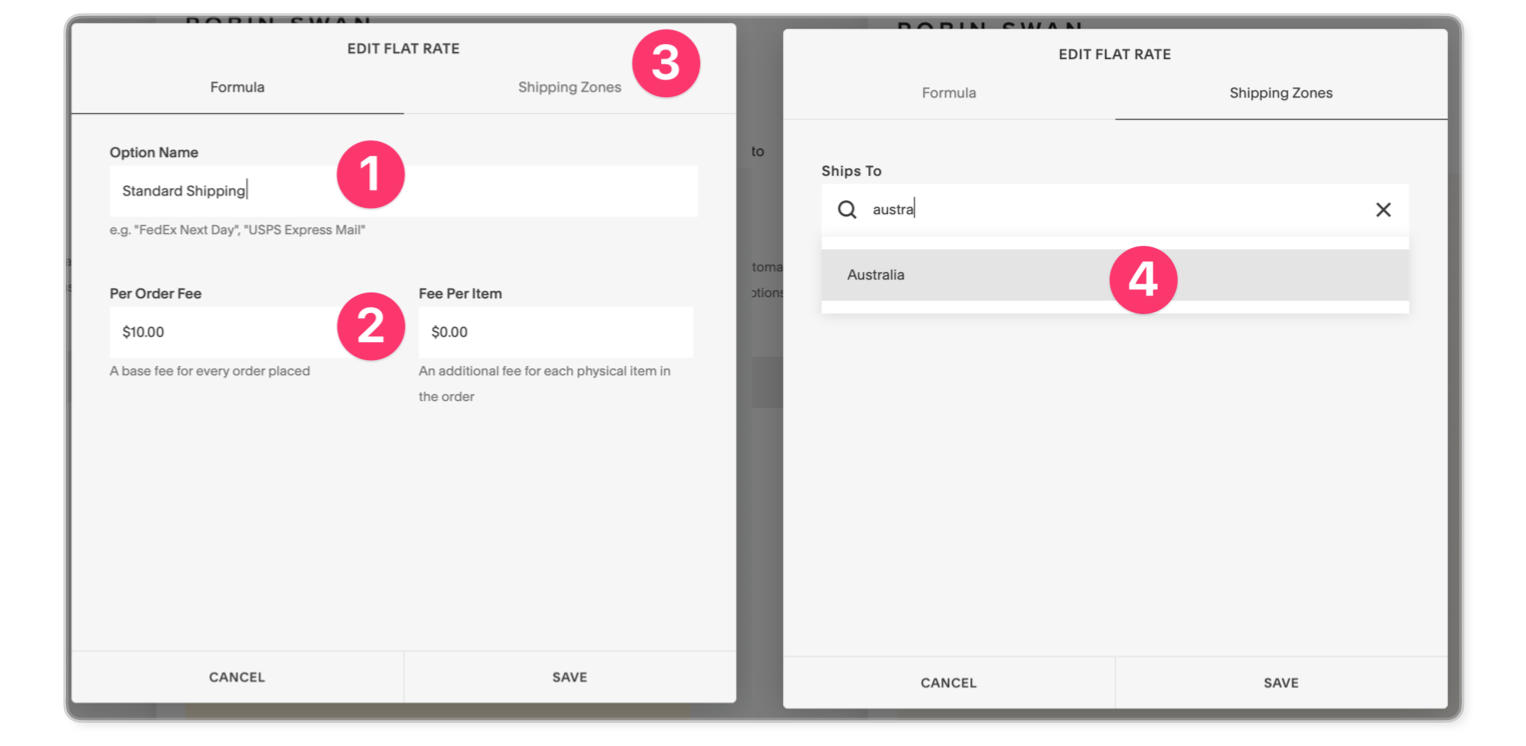
First, set up your flat rate shipping option for your country. Navigate to the “Commerce” tab in your Squarespace dashboard, scroll down to select “Shipping.” Then choose “Add shipping option.” Select “Flat Rate” from the pop-up that appears.
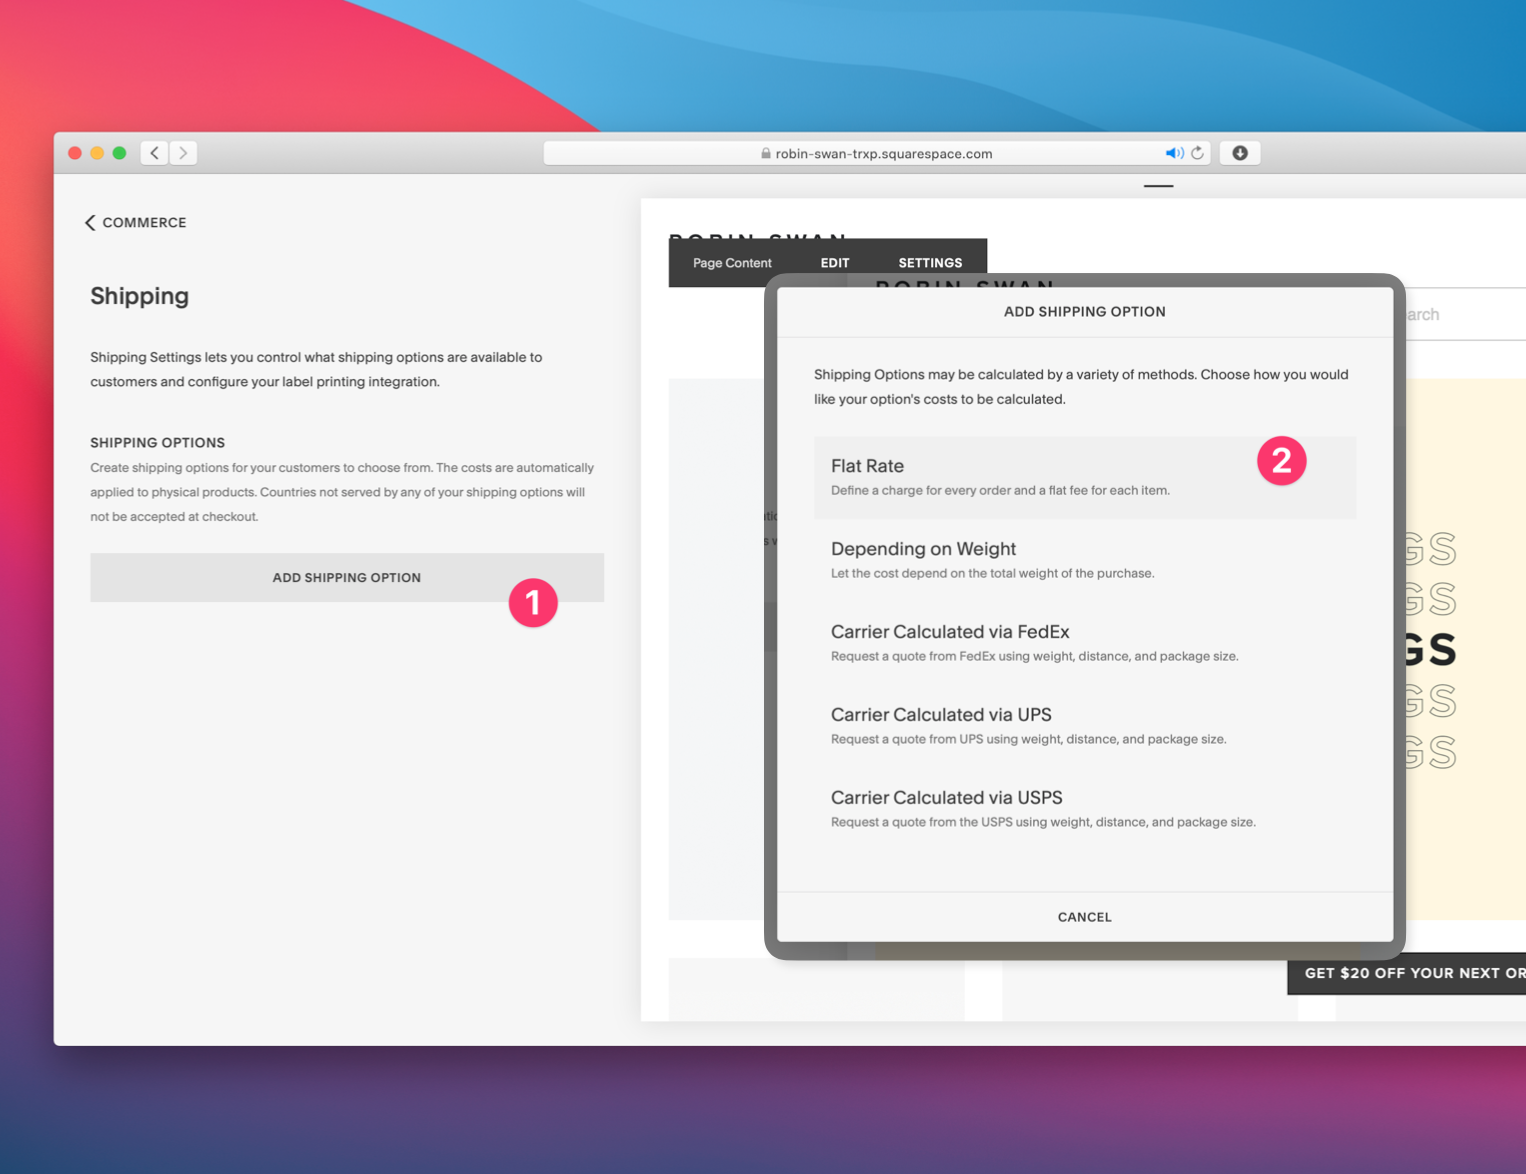
Next, set up the flat rate shipping options for your country. Enter the name for your shipping option (“Standard Shipping“), the shipping rate you’ll use, and add your country as a shipping zone.
Now we need to add the discount code that gives free shipping to orders over $50.
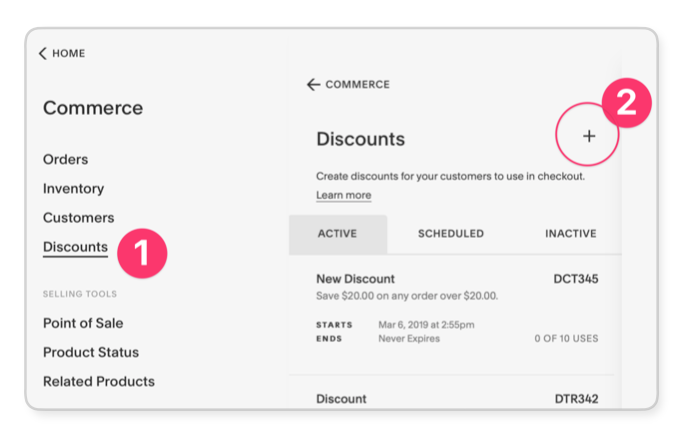 Head back to the “Commerce” section, and choose “Discounts.” Then, click the plus button in the top right to start a new discount.
Now set up the discount code. There are a few fields that need to be set up so that the discount code gets automatically applied for orders over the desired amount, and to limit the shipping to only the region you've specified.

Name your discount
Choose the “Automatic Discount” trigger so that it'll apply automatically at checkout
Choose the Free Shipping promotion so that the shipping cost will show up as $0.00 in the customer's order confirmation
Select “Orders Over” under the “Applies To” section, and enter $50
Select the name of the shipping option you set up previously (“Standard Shipping”)
Then, scroll down to the bottom of the discount code configuration. Select the “Never Expires” checkbox so that the automatically-applied discount code will always work for orders over $50.
Domestic and international stores
If you're also shipping internationally, we'd recommend offering free shipping (for orders over $50) to customers in your country of origin, and flat-rate shipping to your international customers. This option is easy to message in your FAQs or product pages.
Follow the instructions under “Domestic stores” to set up the free domestic shipping option. Then we'll set up flat-rate shipping for international customers.
In the “Commerce” section, choose “Shipping,” then select “Add Shipping Option.” Choose “Flat Rate” from the pop-up that appears.

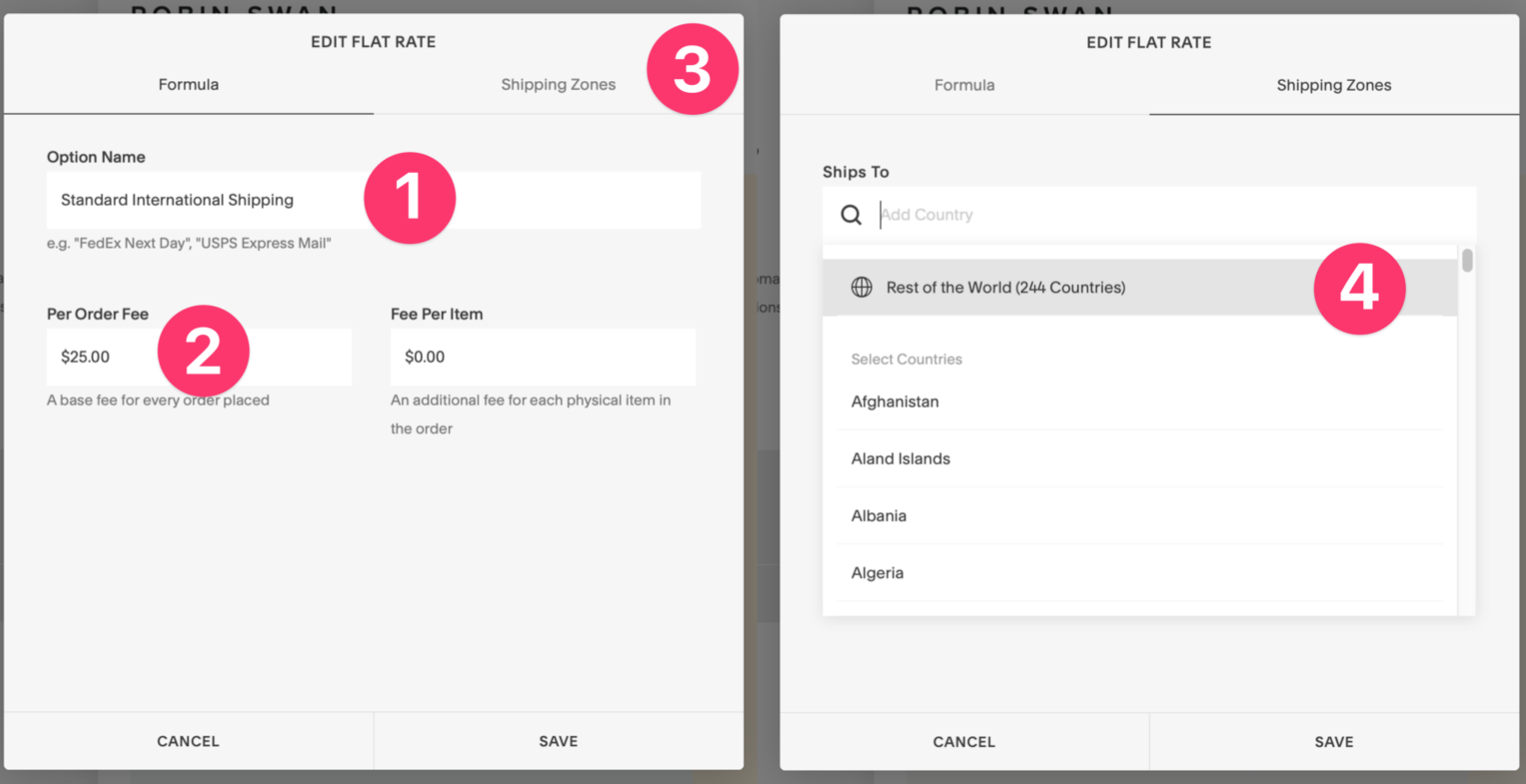
Then, configure your shipping option. Enter the name of the shipping option (“Standard International Shipping”), set the flat rate for the shipping cost, and under “Shipping Zones,” select the “Rest of world” option.
Stores with really different item sizes
If the products you're selling vary a lot in their size and weight, or where the cost of shipping is going to be a large fraction of the order's total cost, you'll need to use variable rate shipping. You have two options.
Carrier calculated
This is only available for stores in the United States, but it'll give the most accurate shipping costs because they'll be tailored to each order's specific size and weight for your mail service.
Calculated by weight
For international stores that sell items that'll cost a lot to ship, or sell items that vary a lot in their weight, you'll need to set up custom shipping rates for ranges of weights for different countries. This can be quite tedious to set up, which is why it's our least preferred option.
Once you've set up shipping options, your site is ready to receive orders!
In the next section, we'll run through placing the first test order, and show you how to handle the back-office operations for your online store with Squarespace.
Getting Started – Managing Your Store
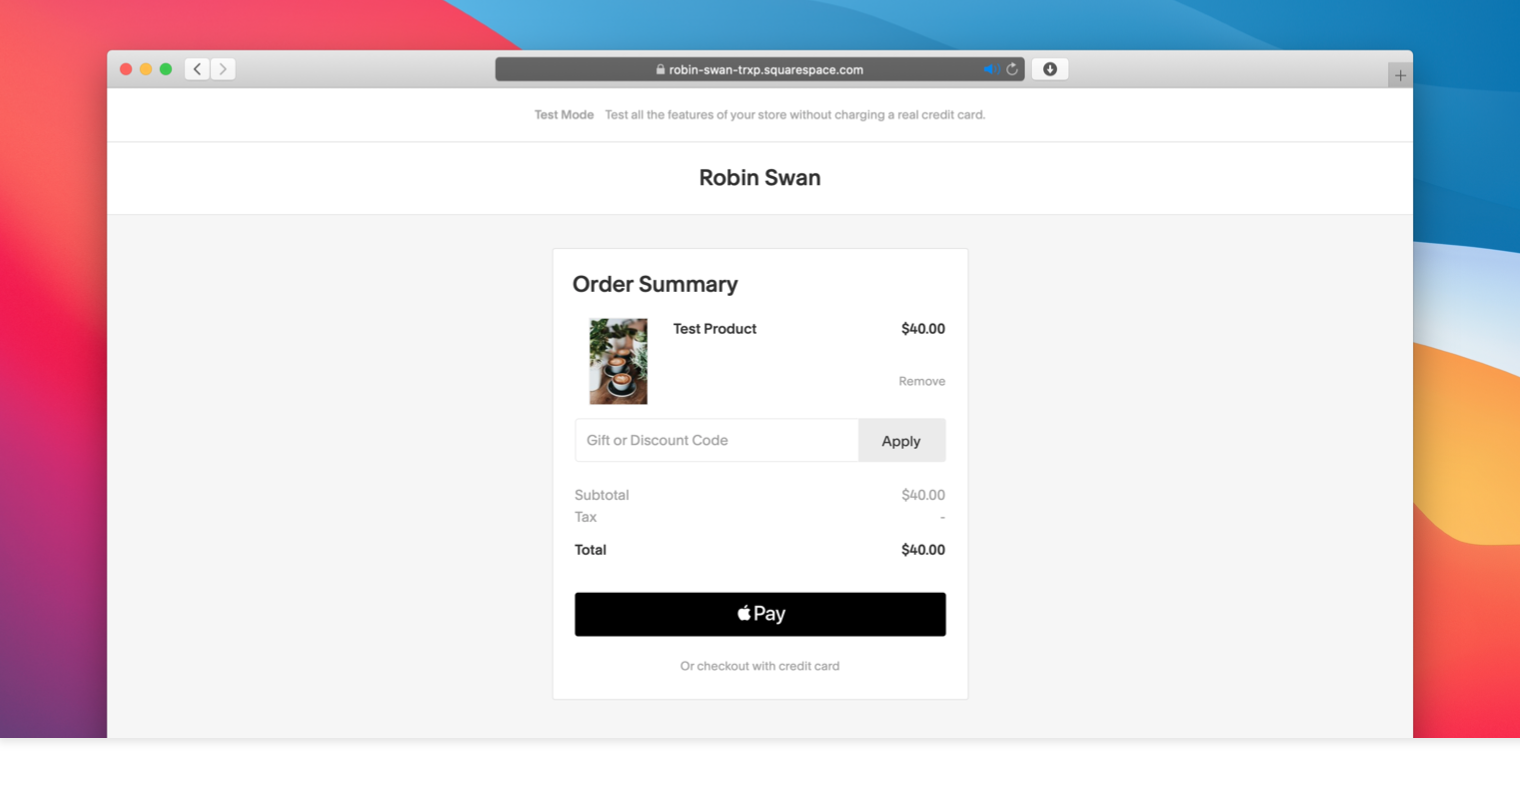
Once you've added a payment processing method, you'll be able to place test orders on your store.
Place a test order
How do you try out the checkout experience on your new site? There are two ways to place test orders.
Refund yourself immediately
This is the recommended method. With this method, you'll place an order using real payment information, and then in the Squarespace backend cancel and refund the order.
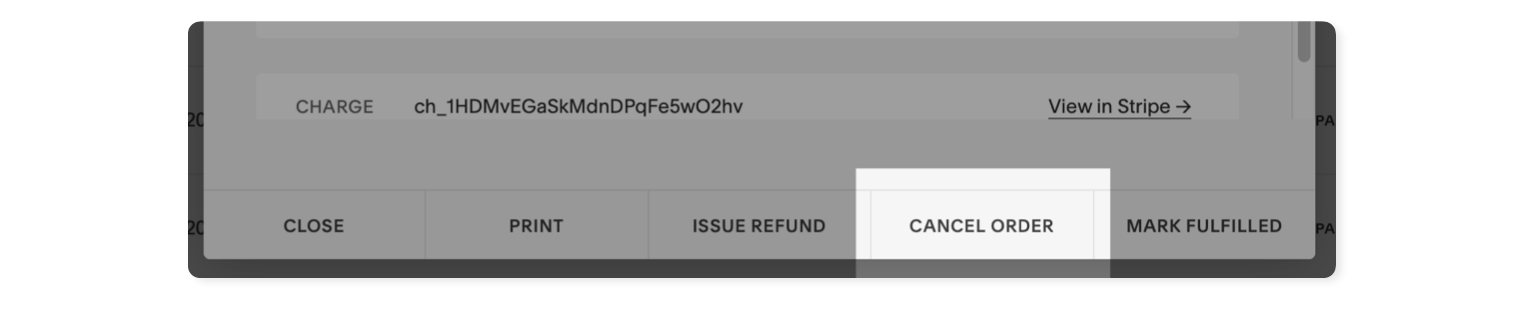
Once you've placed the order, head to your Squarespace dashboard. Click “Orders,” and select your test order. A pop-up showing the order details will appear. Click the “Cancel Order” button in the toolbar at the bottom.
-
Put your site in test mode
This method is only available if you're using Stripe as your payment processor. Test mode will put your entire site in a state where no charges occur – so you won't be able to accept any real payments.
To put your site in test mode, click “Commerce,” then select “Payments.” At the bottom of the payments panel, there is a button to enable or disable test mode. Select this option.
When you're in test mode, a banner will appear at the top of the checkout page to indicate that no real charges will occur.
Fulfilling orders
When an order comes into your store, you'll need to fulfil it once you've sent it off to the customer. This helps you keep track of which orders you still need to send out.
If it's a physical product or service, you need to manually mark orders as fulfilled once you've shipped the item or completed the service. For digital products, these are delivered automatically via email and are marked as fulfilled immediately.
In the “Orders” section of your Squarespace dashboard, you'll see orders that are “Pending,” “Fulfilled,” or “Cancelled.”
To fulfil an order, open the order details pop-up. Then click “Mark Fulfilled” in the toolbar.
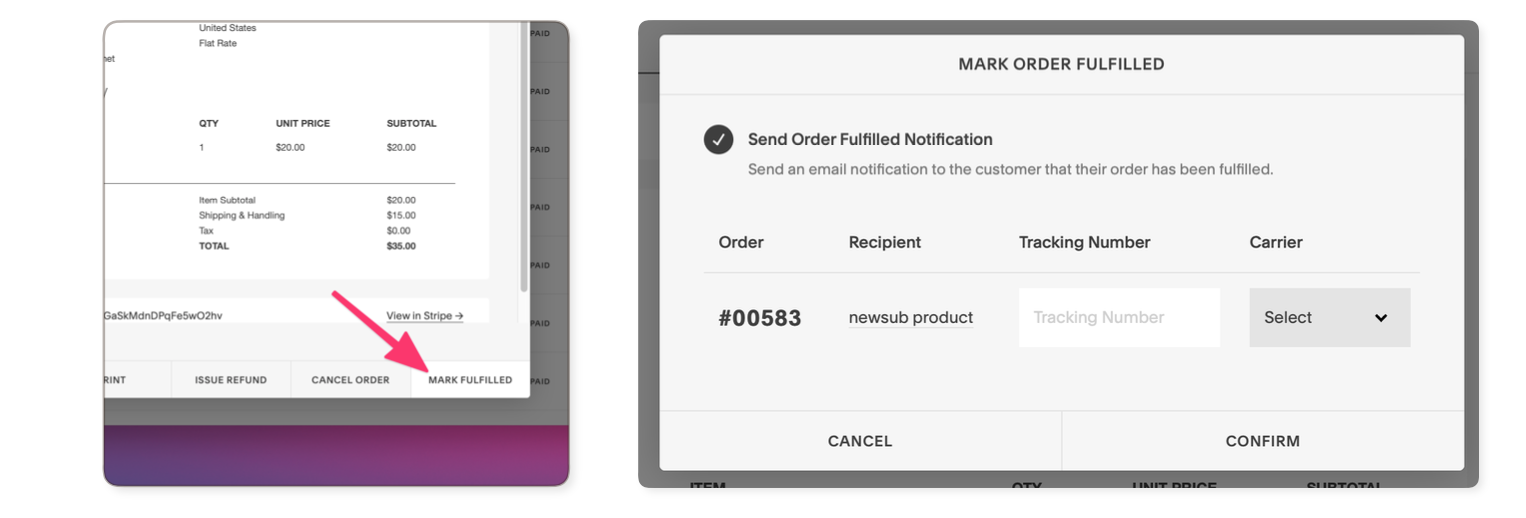
This will show the fulfilment details for the order. In this panel, you can enter the tracking number for the shipment so that your customers can track their delivery using your mail carrier.
Once you fulfil the order, your customer receives an order fulfilment email. This will contain the tracking number if one is specified.
Managing order cancellations and refunds
Sometimes, you'll need to cancel an order or refund a customer. Squarespace makes this easy.
Squarespace supports partial refunds, which are useful if a customer returns just one item from their order, as well as full refunds, which includes the product cost, tax, shipping, and Squarespace's transaction fees.
Don't do refunds in your payment processor (e.g. Stripe) – do them through your Squarespace dashboard instead.
To refund an order, open the “Orders” section of your Squarespace dashboard. Select the order you want to refund.
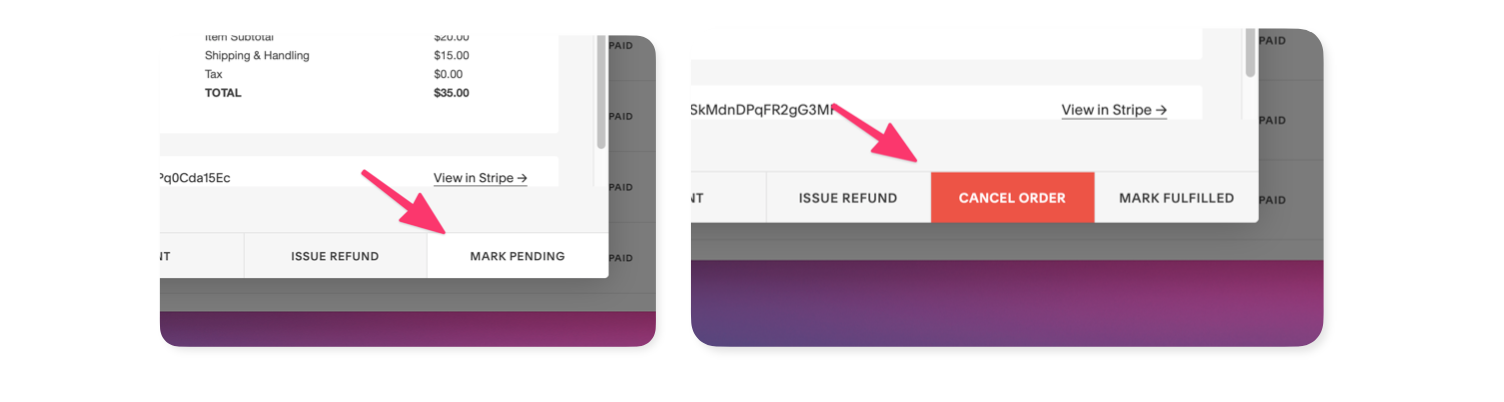
If the order is “Pending” (i.e. you haven't fulfilled or cancelled the order yet), select “Cancel Order.” This will issue a full refund and mark the order as cancelled.

If the order has already been fulfilled (i.e. you’ve shipped out the product and marked it as “Fulfilled’), you have two choices depending on whether you want to make a partial or a full refund.
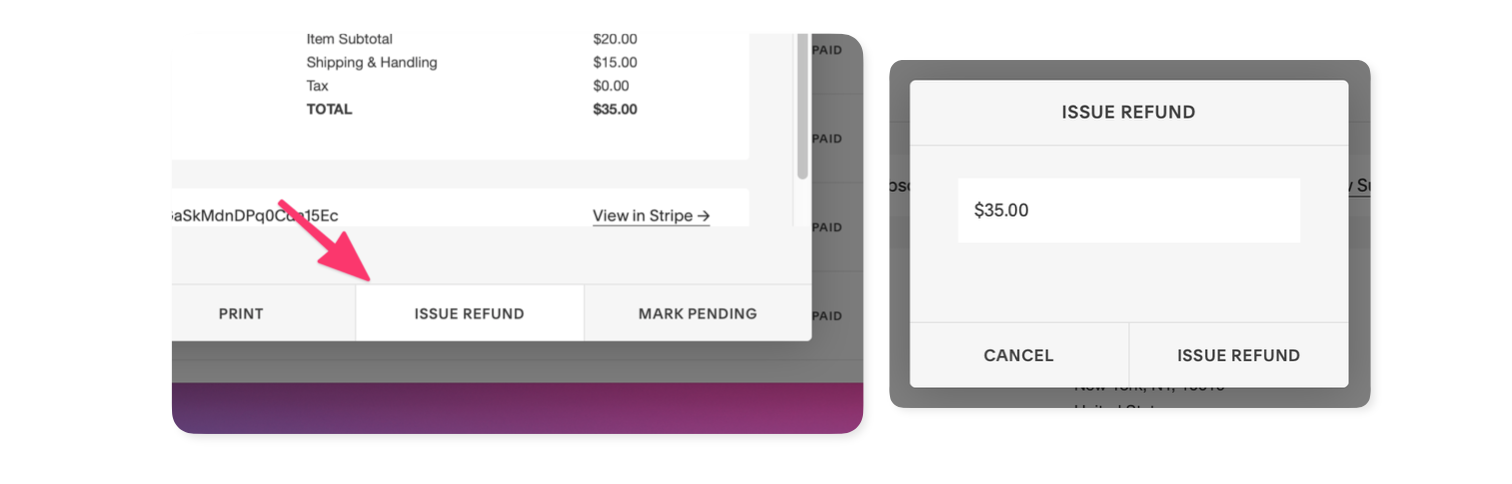
Partial refund
To make a partial refund, click “Issue Refund” and then enter the amount you want to refund.
Full refund
To make a full refund, make the order pending again by selecting “Mark Pending.” This moves the order back to the pending tab, so you'll need to find that order again in your orders list. Select it, and then choose “Cancel Order.”
Selling subscription products and services
Squarespace makes it easy to sell subscription products and services. There are two steps to set this up. First, enable customer accounts for your store. Second, create your subscription product.
Enable customer accounts
Customer accounts let your visitors sign up for accounts that they can re-use when they visit your site again. They'll be able to sign up with their email address and a password, and their account will have their address and payment information saved.
Customer accounts significantly speed up the checkout experience for repeat customers.
Customer accounts do require the Commerce Advanced plan, but most of the time the extra revenue from repeat customers will make up for the difference in cost.
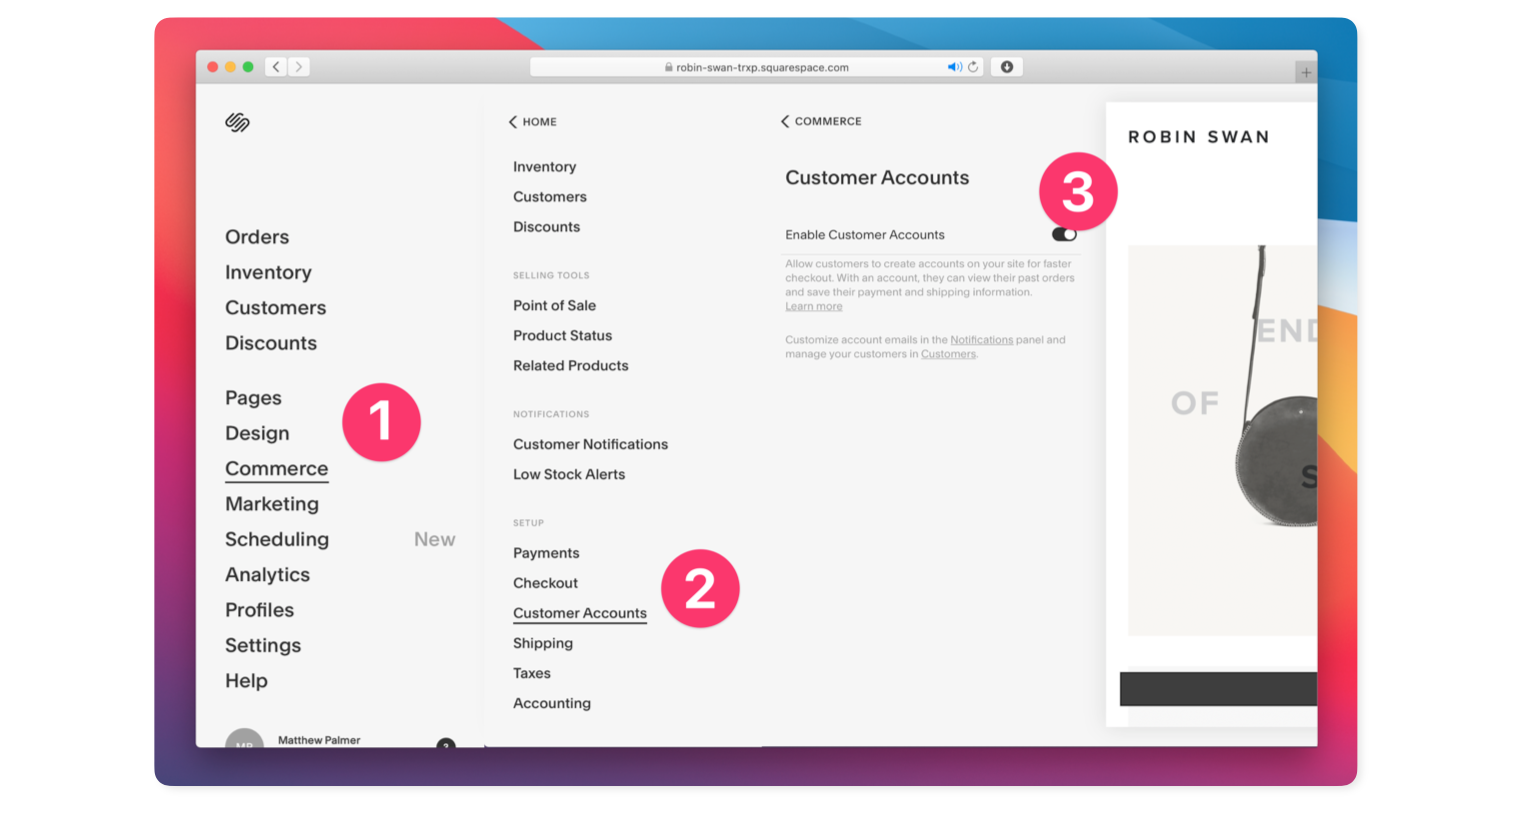
To enable customer accounts, select “Commerce,” scroll down to “Customer Accounts,” and then flip the switch to turn on customer accounts.
If you're on Squarespace 7.1, Squarespace will automatically add a “Sign In”/“My Account” link to your site's navigation.
If you're using version 7.0, you'll need to be using one of the following templates to get automatic customer accounts integration:
- Adirondack
- Avenue
- Bedford
- Brine
- Five
- Galapagos
- Montauk
- Pacific
- Skye
- Supply
- Tremont
- York
Create a subscription product
Once you've set up customer accounts, you can sell subscription products through Squarespace.
It works just like creating a regular product. Head to “Pages,” select “Shop” (or another product collection page), then select the plus button to create a new product.
Select either the Physical or Service product type, then tick the “Subscription Product” checkbox in the product details pop-up.
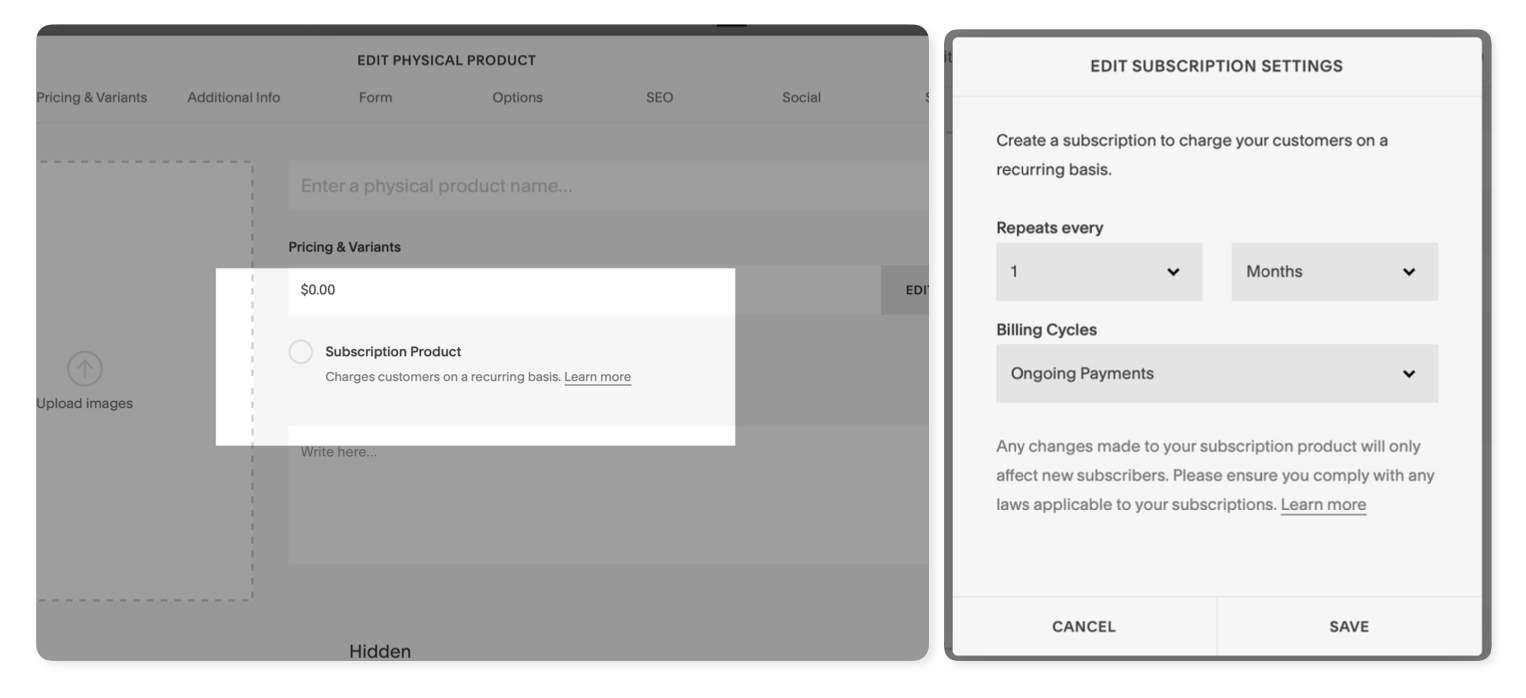
When you switch “Subscription Product” on, a pop-up will appear where you can set the repeat frequency and the number of billing cycles that should occur by default.
When a customer purchases one of your subscription products, they'll be taken to create a customer account for your store. They can use this customer account to manage their subscription in the future.
Physical Stores & Point of Sale (POS) Integration
If you sell products in person as well as online, you can set up Point of Sale integration.
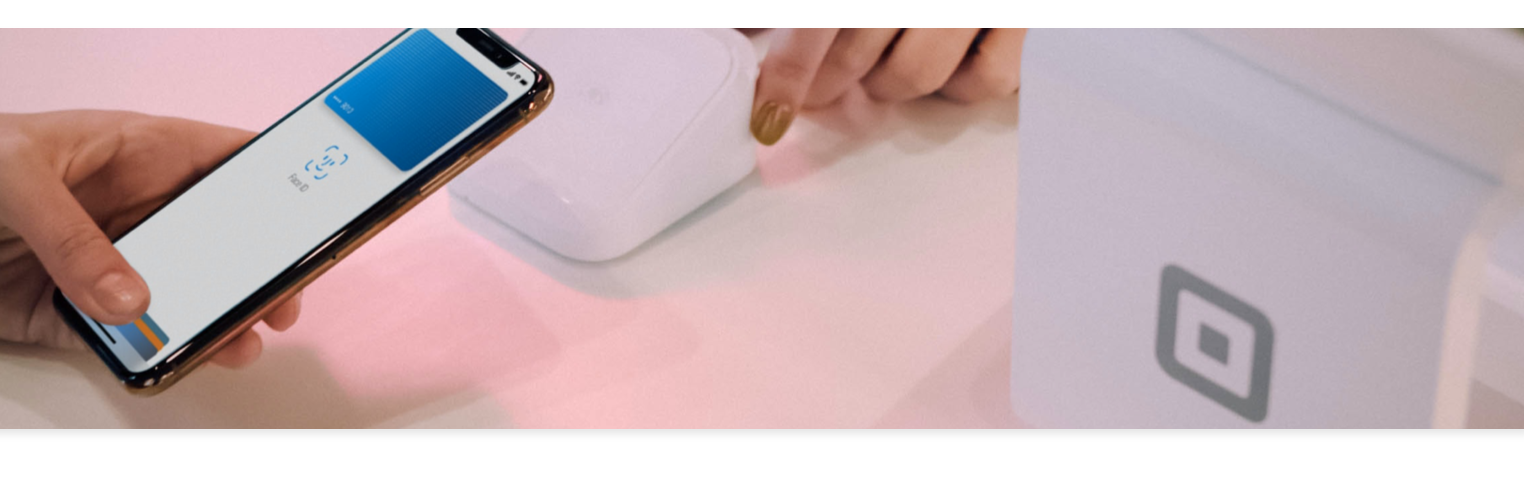
Squarespace offers a really seamless integration with a Square Reader. These readers are perfect for small, independent stores.
There are three main benefits to integrating your online and physical sales systems:
Inventory management – sales you make online and in person will automatically update your inventory levels in Squarespace, so you'll know when you're out of stock
Sales history – because orders placed in person will be sent to Squarespace, they'll appear in your “Orders” panel alongside your online orders
Analytics – it's easy to compare month-over-month sales using Squarespace's e- commerce analytics tools
To set up the PoS integration, you'll first need to get a Square Reader and set up a Square account. Square will process payments made through the reader (like Stripe but for in- person sales).
Once you have your Square Reader, download the Squarespace Commerce iOS or Android app. Sign in to your Squarespace account in the app.
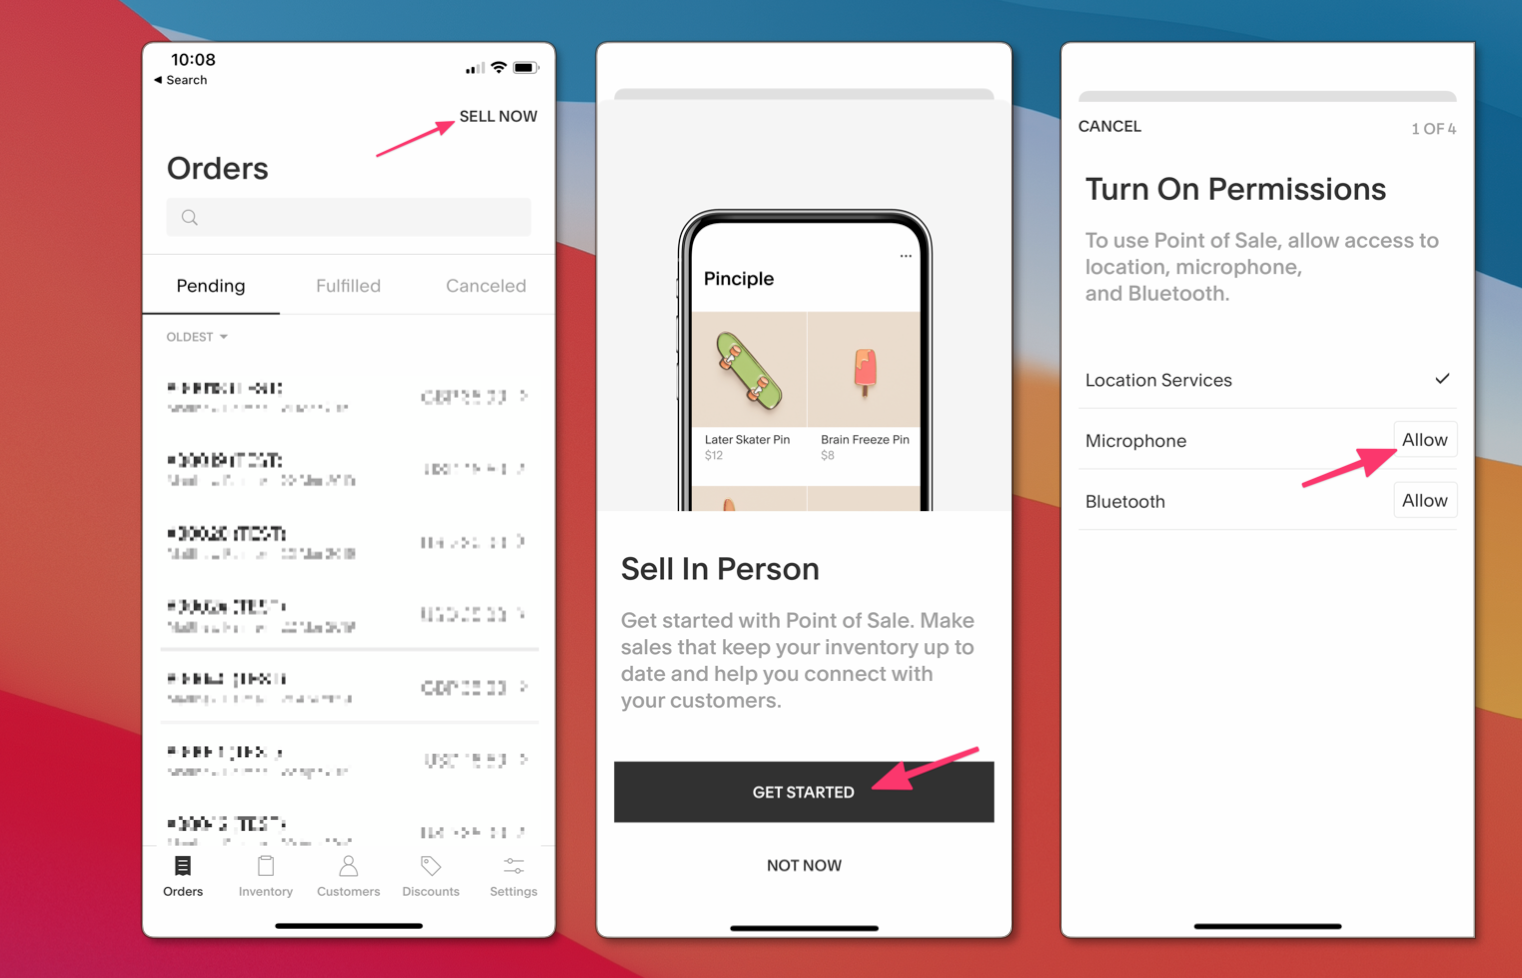
Tap the “Sell Now” button in the top right to active Point of Sale mode. Tap “Get Started,” and then enable the necessary permissions for the Square Reader to work.
You’ll then need to connect your Square account by following the tutorial. (If you want to connect your Square account later, you can do so by tapping the settings icon in the top right when you’re in Point of Sale mode, and then selecting “Payment Options.”)
Once you’ve connected your Square account, you can make a sale.
In Point of Sale mode, you’ll see a list (or grid) of your products. When checking out a customer, tap on the products you want to add to the customer’s bag.
Then, tap on the Bag summary, and then select “Charge” to collect the payment using the attached Square Reader.

Plug-ins, Extensions, and Add-Ons
If you want to add extra functionality to your Squarespace store, or maybe make some advanced design customisation, you'll probably be able to find a plugin to fit your needs.
In 2020, Squarespace launched their official extensions gallery, with new extensions getting added all the time. The best way to explore these is to head to the extensions home page.
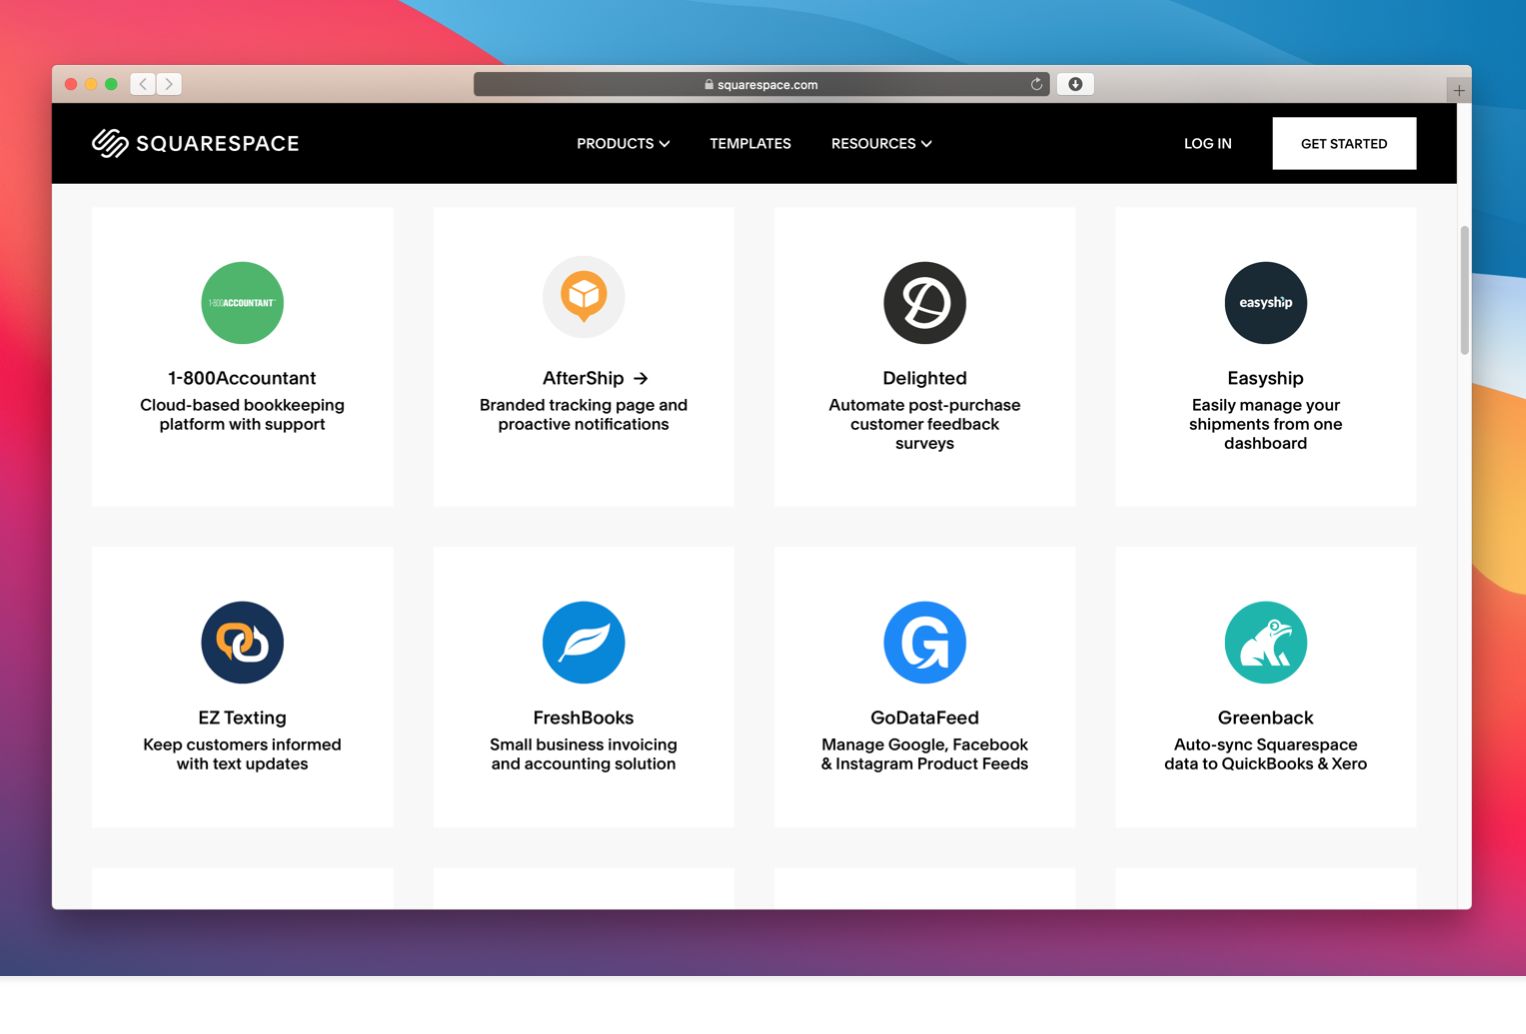
There are a lot of third-party extension providers and plug-ins that Squarespace hasn't added to their extensions gallery yet. We'll run through some of our trusted providers.
Ghost Plugins
Ghost Plugins offers the best range of free Squarespace plugins and templates. You can get a tonne of plugins without even creating an account. They also offer premium plugins and templates, if you find something you really need. They have great stuff:
- Bubble navigation menu
- Shrinking logo on scroll
- Product variant buttons
- Ghost+ Unlimited templates plan
SQSPThemes
SQSPThemes offers a curated collection of third-party Squarespace templates, as well as some excellent plug-ins, including:
- Lightbox / Video lightbox
- Accordion tabs
- Sidebar
- Countdown timers
Squarepaste
Squarepaste has a huge range of plugins and templates that you can copy-and-paste into your Squarespace code injection settings. We really like:
- Sort by price
- Color image on hover
- Form character limit
- Animated word switcher
SquareStudio
SquareStudio is another provider of excellent Squarespace plugins, especially their product reviews (essential!) and parallax scroll effect. Some sites also really like to use their automatic watermark plugin to make sure their images can't be copied without a logo.
Peach's
We're Peach's! We wrote this guide for you.
You can find out more about us on our home page. We have a couple of really powerful plug-ins that help you grow and market your store.
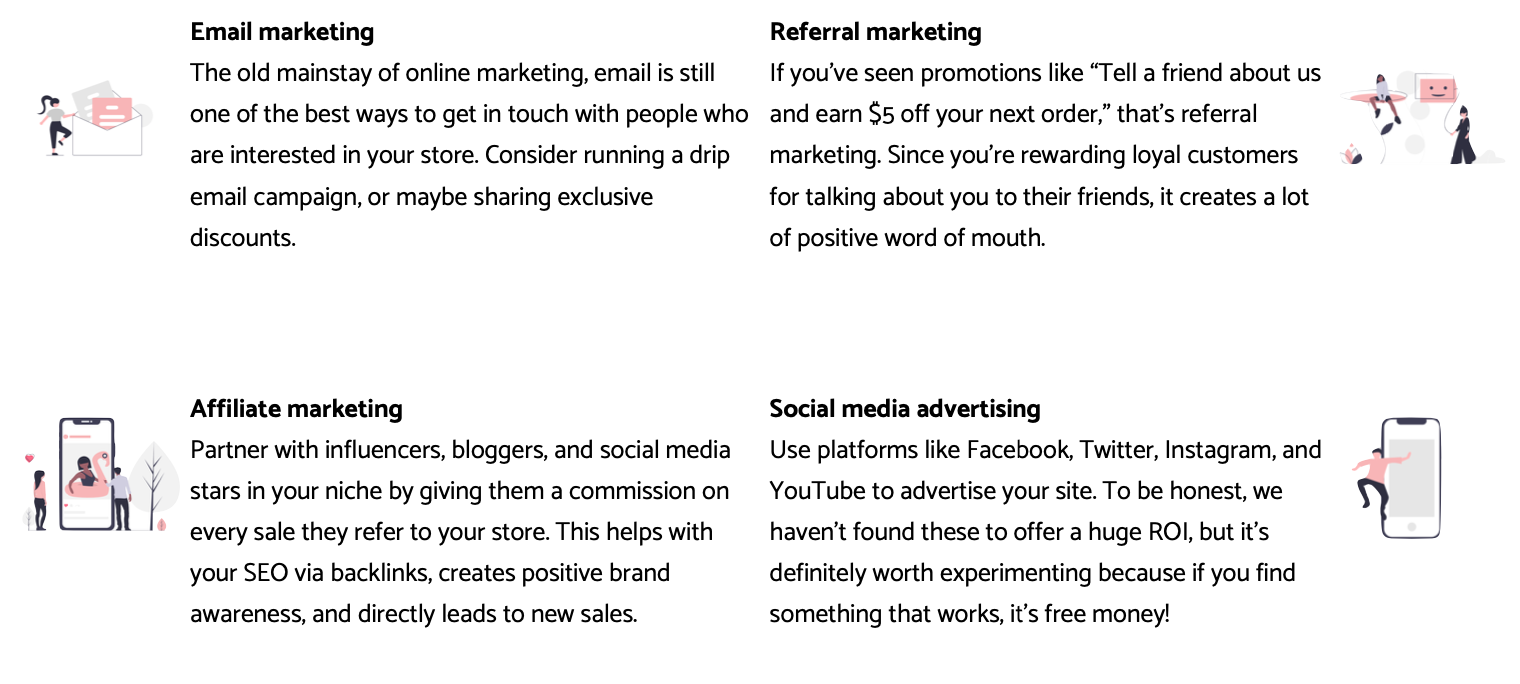
Referral marketing
Referral marketing is when you run a promotion like “Tell a friend about us and earn $5 off your next order.”
It's a great way to grow your store through word of mouth and reward loyal customers.
With automatic referral tracking, integrated widgets, and powerful stats, our refer-a-friend marketing plug-in makes it really easy to set up and run a successful referral marketing promotion.
Affiliate marketing
Affiliate marketing is a great way to partner with influencers, bloggers, and content creators in your niche.
You'll pay your affiliates a cash commission (using PayPal, Venmo, or Stripe) when they send an order to you.
Our affiliate marketing plugin offers the deepest integration with Squarespace – it's super fast to set up, and you can use affiliate links, discount codes, and custom landing pages for tracking.
We also offer a great social proof and sales verification plugin, and a super useful speed test tool. Plus, you can read all our other guides and articles about Squarespace.
Marketing and growing a store in 2026
In a lot of ways, marketing a store in 2026 is better than it's ever been for independent businesses. Why?
- Modern marketing tactics are a lot more cost-effective than old-school advertising – a couple hundred dollars per month for marketing tools, rather than paying money for ineffective advertising space
- You can partner with regular people who are influencers instead of finding celebrity endorsements who charge a lot more
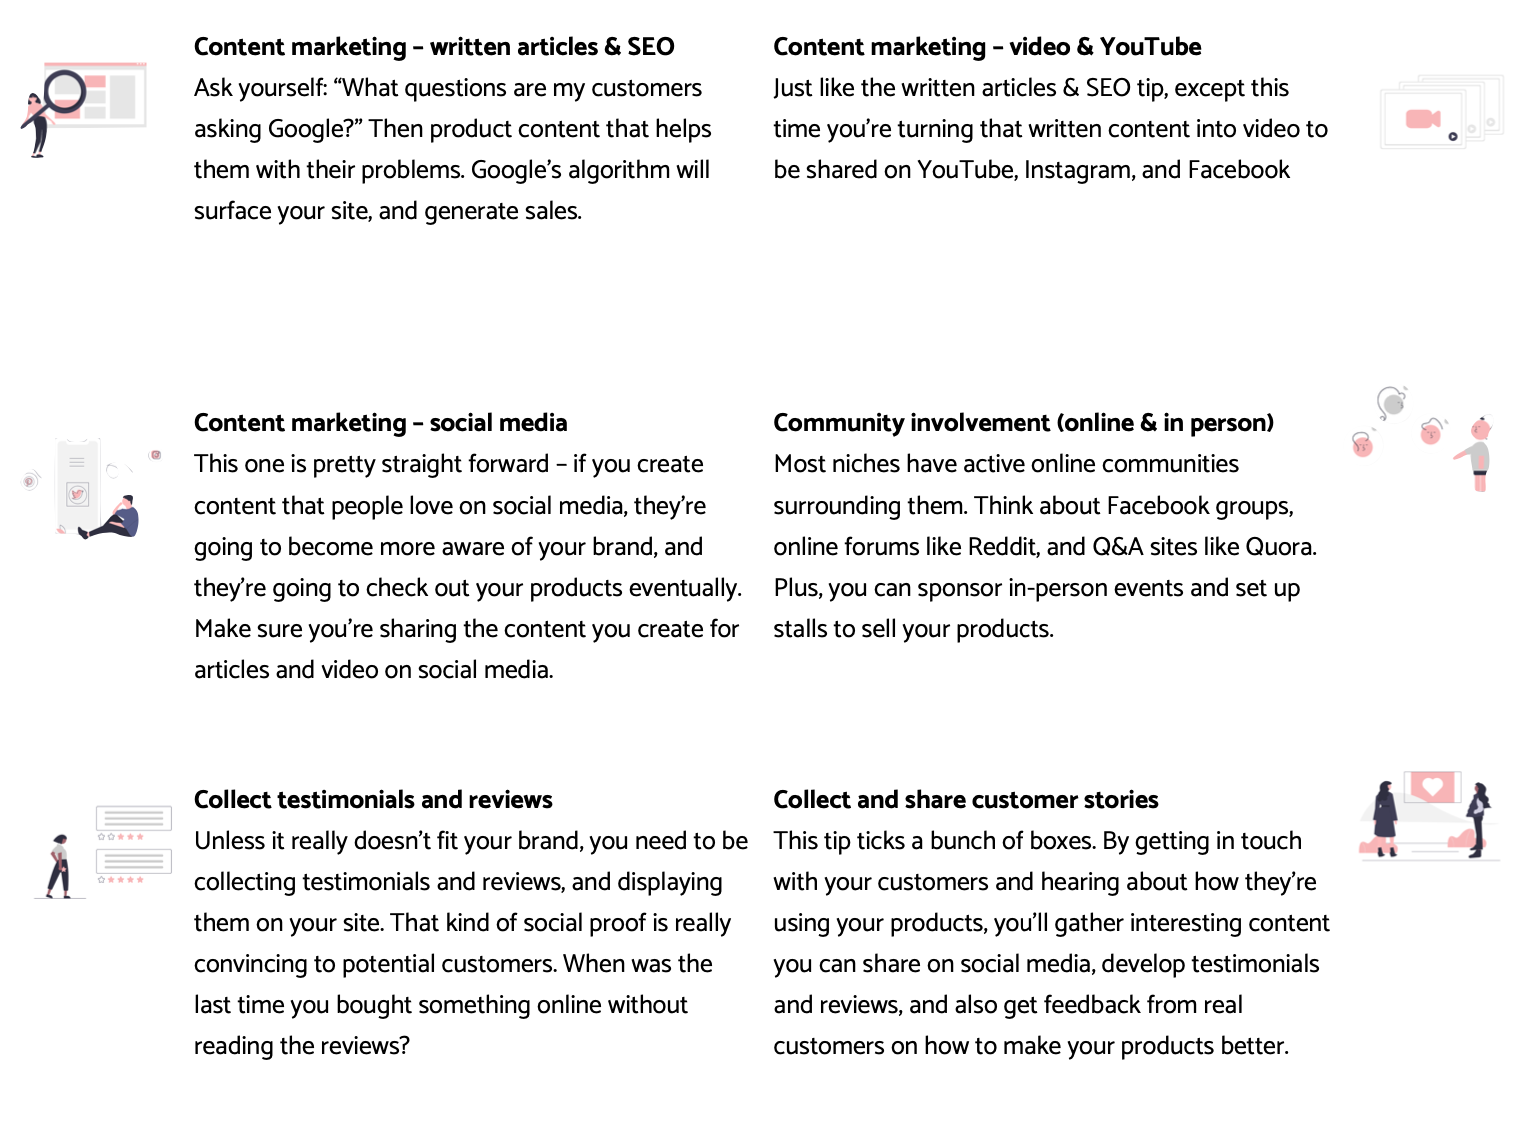
- There's no cost to creating content for search and YouTube, but the algorithms on these platforms will surface your products naturally
- You can target your niche much more effectively than ever before
So, what types of modern marketing are available to you? Here's our go-to checklist for the stores we work with. If one of these interests you, do some research and experiment with it.
Frequently Asked Questions
How do I sell a subscription through Squarespace?
Squarespace makes it easy to sell a subscription product or service.
Create your store
Upgrade to Squarespace Commerce Advanced
Switch on customer accounts following our guide here
Create a subscription product following our guide here
That's it! Your subscription product is ready for customers to purchase.
How do I sell a course through Squarespace?
Once you've created your store, selling a digital or physical course on Squarespace couldn't be easier.
Start by following our instructions to create a new product
When you choose the product type, choose “Digital” for digital courses, “Physical” for in-person courses where you physically send out an invitation or ticket, or “Service” for any other scenario
Create the product as per normal
How do I sell a membership through Squarespace?
To sell a membership through Squarespace, you’ll need to use a third-party tool. We recommend Memberful or MemberSpace.